On this page
Creating tables in a database with phpMyAdmin
Learn how to create a new table inside a MySQL database using phpMyAdmin in cPanel.
phpMyAdmin lets you build and manage database tables through a point-and-click interface, without writing any SQL by hand. Follow the steps below to create a new table inside one of your databases.
Before you start
You will need a database to put the table in. If you have not created one yet, see How to create a MySQL database in cPanel first. If phpMyAdmin is new to you, Becoming familiar with databases in phpMyAdmin is a helpful primer.
To open phpMyAdmin, log in to cPanel, find the Databases section and click phpMyAdmin.
Create a new table
-
In the left-hand panel, click the database you want to add the table to (for example,
youruser_kbdemo). Its Structure page opens, showing the Create new table form below any tables that already exist. -
Enter a Table name and the Number of columns you need, then click Create. Don't worry about getting the number exact - you can add or remove columns later. In this example we'll create a
memberstable with four columns.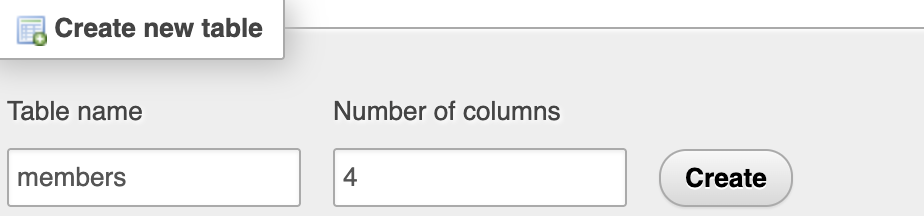
-
Fill in the details for each column. At a minimum, give every column a Name and a Type:
- The first column will be the table's primary key - a unique reference for every row. Name it
id, set the Type toINT(a whole number), choosePRIMARYunder Index, and tick A_I (auto-increment) so phpMyAdmin numbers each new row for you. You can leave Length/Values blank, as modern versions of MySQL ignore the display width on integer columns. - For the remaining columns, pick a Type that suits the data and, where it applies, a Length.
VARCHARis the usual choice for short text such as names or email addresses; its Length is the maximum number of characters allowed. UseDATETIMEfor a date and time,TEXTfor long text, andINTfor whole numbers.

When you choose
PRIMARYunder Index, phpMyAdmin opens a small Add index box to confirm the key - just click Go to accept it.Every table should have a primary key. An auto-incrementing integer column called
idis a common, reliable choice. - The first column will be the table's primary key - a unique reference for every row. Name it
-
Once all the columns are defined, click Save.
Your new table is created and phpMyAdmin opens its Structure view, listing the columns you just defined. The table also appears under the database in the left-hand panel, ready for you to add data.

Next steps
- To add, rename or remove columns later, see Inserting fields into database tables with phpMyAdmin and Modifying fields in database tables with phpMyAdmin.
- To pull records back out or run your own queries, see Running SQL queries on a database with phpMyAdmin.
If you would like a hand, our support team is available 24/7 - just open a support ticket.