On this page
Using Smart Updates in WP Toolkit
Smart Updates in WP Toolkit clones your site, tests updates safely, and only applies them to your live site if no new issues are found.
Keeping WordPress themes and plugins up to date is essential for security and performance, but updates can sometimes break things. Smart Updates in WP Toolkit solves this by testing every update on a cloned copy of your site before touching the live version.
How Smart Updates works
Before making any changes, Smart Updates runs through the following process:
- Initial analysis - scans your live site for existing issues such as PHP errors and HTTP response errors.
- Cloning - creates an exact copy of your site in a safe sandbox environment.
- Further analysis - runs comprehensive checks on the clone to identify any pre-existing problems.
- Safe updating - applies the selected updates to the cloned site only.
- Issue detection - compares the before and after state, then produces a detailed report of any new issues introduced by the updates.
- Decision point - for manual updates, you review the report and inspect the cloned site before deciding whether to apply changes to production. For automatic updates, the live site is only updated if no new issues are detected; if problems are found, the update is skipped and you receive an email notification.
How to run Smart Updates manually
Step 1: Open WP Toolkit
- Log in to cPanel.
- Click WP Toolkit in the left sidebar.
- You will see a list of all WordPress installations on your account. If none appear, click Scan to search for existing WordPress sites.
Step 2: Start the update
- Find the site you want to update and click Updates.
- You will see pending updates grouped into WordPress core, plugins, and themes.
- In the top-right corner, make sure the Smart Updates toggle is switched on.
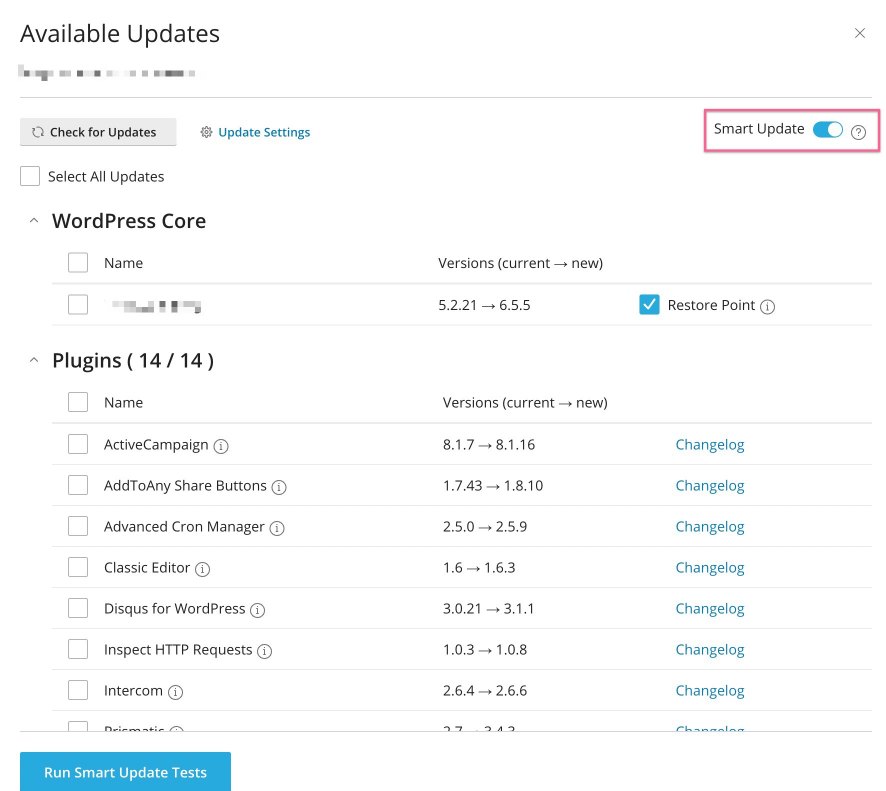
- Select the items you want to update, or choose Select All Updates to update everything.
- If core updates are available, you will be offered the option to create a restore point. This is strongly recommended so you can roll back if something goes wrong.
- Click Update to start the process. WP Toolkit will clone your site, apply the updates to the clone, and run its automated tests.
Step 3: Review the report
- Once the tests complete, WP Toolkit displays a report summarising the results.
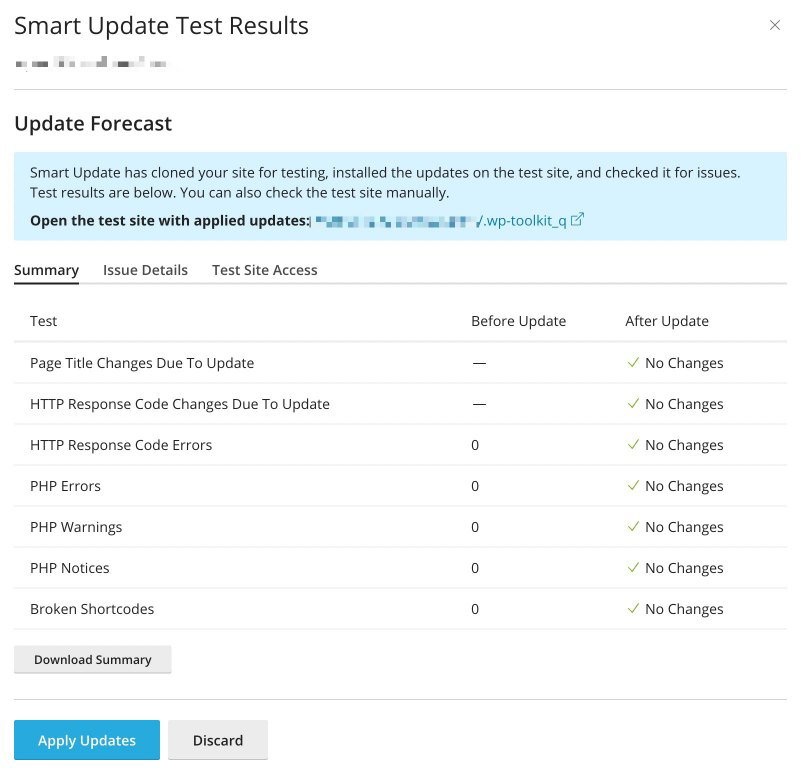
- Visit the cloned site to check it yourself - both the front end and the WordPress admin area.
- If you are satisfied, click through to apply the updates to your production site.
- After the live site updates, confirm everything still works correctly. If you spot any problems, restore from the backup or restore point you created earlier.
Enabling automatic Smart Updates
If you would rather not run updates manually, you can configure WP Toolkit to handle them for you. It checks for updates every 24 hours and only applies them if Smart Updates detects no new issues.
Step 1: Enable Smart Updates and open auto-update settings
- In WP Toolkit, scroll to the site you want to configure.
- Make sure the Smart Updates toggle is set to On.
- Click Autoupdate settings.
Step 2: Configure auto-update settings
- WordPress core - next to "Update WordPress automatically", choose one of the following:
- Yes, but only minor (security) updates - minimum recommended setting.
- Yes, including major updates - if you want all core updates applied automatically.
- Plugins - next to "Update plugins automatically", choose one of the following:
- Defined individually, but security updates are autoinstalled - minimum recommended setting.
- Yes, all updates - if you want all plugin updates applied automatically.
- Themes - next to "Update themes automatically", choose one of the following:
- Defined individually, but security updates are autoinstalled - minimum recommended setting.
- Yes, all updates - if you want all theme updates applied automatically.
-
Click OK to save.
-
If you chose Defined individually for plugins or themes, go to the Plugins and Themes tabs and select which items should receive automatic updates.
While you are reviewing the Plugins and Themes tabs, remove anything you no longer use. Inactive plugins and themes can still pose security risks, and keeping only what you need helps maintain performance.
Step 3: Monitoring and notifications
- WP Toolkit checks for updates every 24 hours.
- If Smart Updates detects a problem, the update is skipped and you receive an email to the contact address set in cPanel. To make sure you receive these notifications, verify your address under the Contact Information section in cPanel.
Important notes
Disk space - Smart Updates needs to clone your site, so your cPanel account should have at least 50% free disk space available. If you are running low, contact our support team to discuss an upgrade.
- Premium plugins and themes - WP Toolkit may not be able to update paid or premium plugins and themes automatically. Check the documentation for each premium item and consider excluding them from auto-updates. Always follow the developer's recommended update procedure.
- Email notifications - Smart Updates emails your cPanel contact address if an issue is detected during automated testing. You can then review the test results and inspect the cloned site before deciding whether to update your production site.
If you need any help setting this up, our support team is available to assist.