On this page
Configuring LiteSpeed Cache with WordPress
Learn how to install and configure LiteSpeed Cache for WordPress, from enabling it in cPanel through to advanced page and image optimisation.
LiteSpeed Cache for WordPress is a server-side page cache that stores your pages at the web-server level, making your site faster and better able to handle traffic. This guide walks you through its key features and how to configure them on Kualo hosting.
This guide is not a replacement for LiteSpeed's own documentation. It highlights specific features and provides recommendations for our platform. Where relevant, we link to LiteSpeed's screen-by-screen guides, which cover every setting in detail.
Advantages of LiteSpeed Cache
- Speed: Significantly reduces overhead, improving site performance.
- Efficiency: Minimises server impact, allowing your site to handle more traffic.
- Ease of implementation: Basic setup requires no special configuration, but advanced users can fine-tune a wide range of settings.
Common misconceptions
If LiteSpeed Cache does not appear to be working on your site, it is usually not a compatibility issue - it is more likely that some settings need adjusting. This guide will help you understand how.
Before you begin
Before diving in, make sure the following are in place:
- Up-to-date WordPress: Ensure your WordPress version is current.
- Latest compatible PHP version: Use the latest compatible PHP version, with OPcache enabled.
- Proper cron job configuration: Configure WordPress to use an actual cron job rather than the default
wp-cron.php.
If you are unsure about any of these, refer to our companion article on 9 steps to optimise your website.
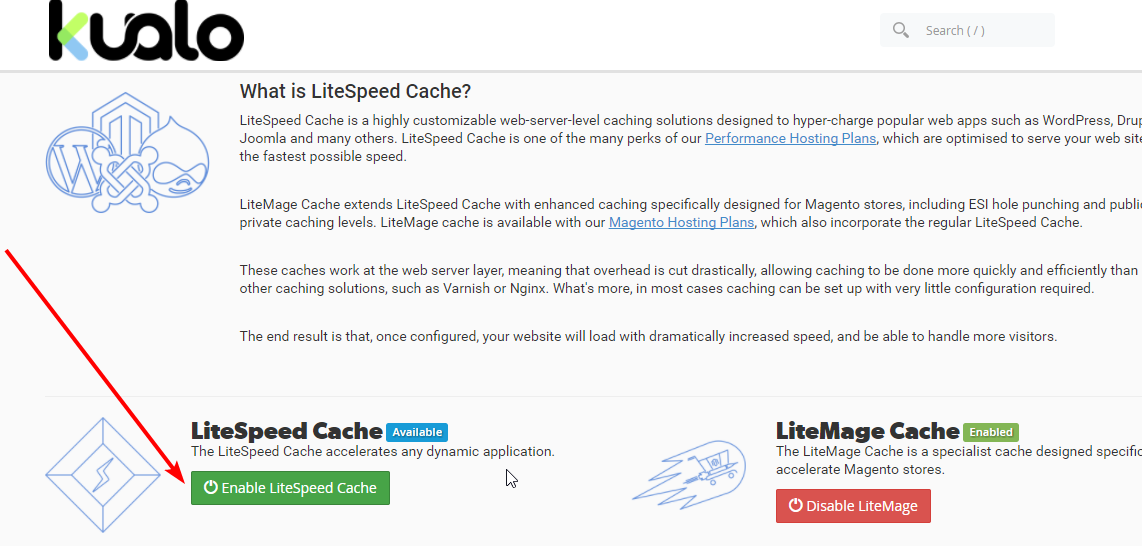
Step 1: Enable LiteSpeed Cache in cPanel
-
Log in to cPanel and go to Software > LiteSpeed Cache, or search for "LiteSpeed" in the search bar.
-
Click the LiteSpeed Cache icon.
-
Click Enable LiteSpeed Cache.
LiteSpeed Cache is now enabled for your account. However, nothing will be cached until the plugin is also installed in WordPress.
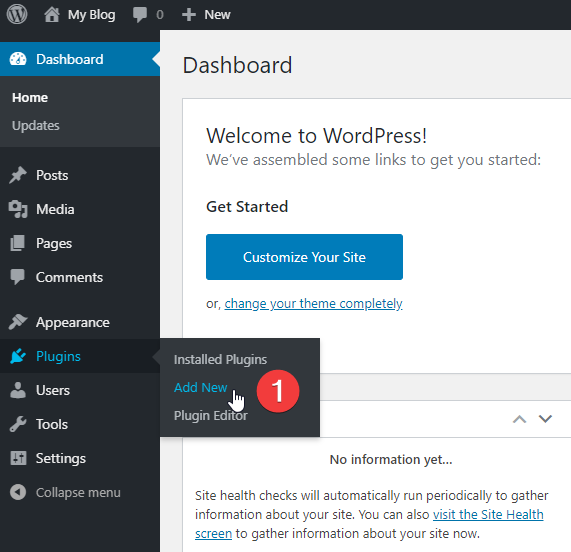
Step 2: Install the WordPress plugin
Before installing any new plugin, it is a good idea to create a staging copy of your website. In its basic form, LiteSpeed Cache should not cause breaking issues, but this can never be entirely ruled out. This is especially true of the advanced optimisation features, which can cause display or functionality problems until fine-tuned. If you want to test features extensively, do so on a non-production staging copy.
-
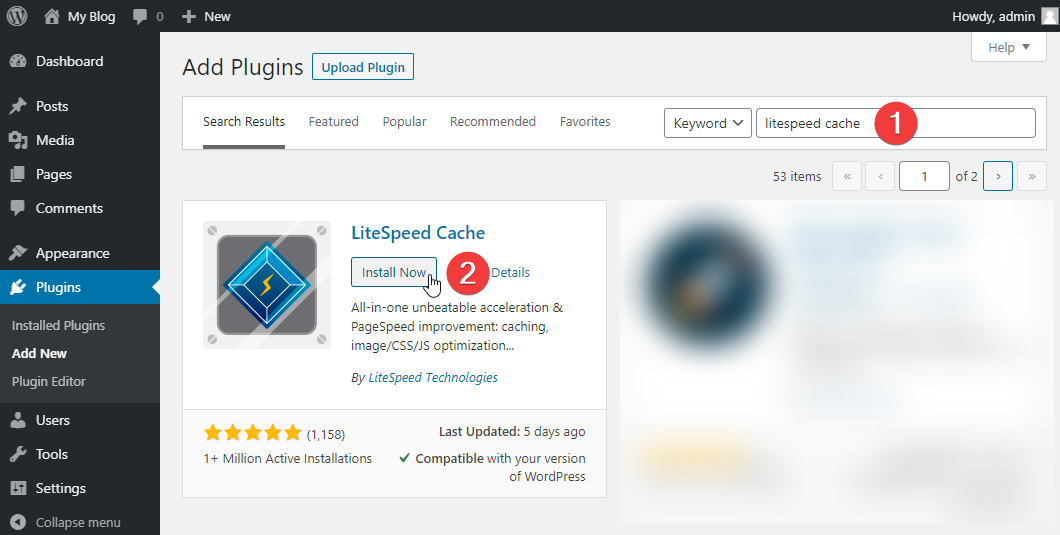
Log in to your WordPress dashboard and from the left-hand menu click Plugins > Add New.
-
Search for LiteSpeed Cache and click Install Now.
-
Click Activate to enable the plugin.
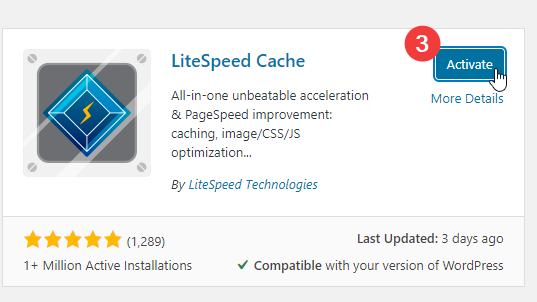
The plugin is now installed and activated. Caching is off by default, so your site will not yet be cached.
If this is an existing site that was previously using a different cache plugin, deactivate and then delete that plugin once you are happy that LiteSpeed Cache is working. You cannot run LiteSpeed Cache alongside another caching plugin.
Step 3: Generate your domain key
A domain key is required for many of LiteSpeed Cache's more powerful features, including image optimisation, Critical CSS generation (CCSS), Unique CSS (UCSS), Low Quality Image Placeholder generation (LQIP), and CDN services. It is best to request this first.
-
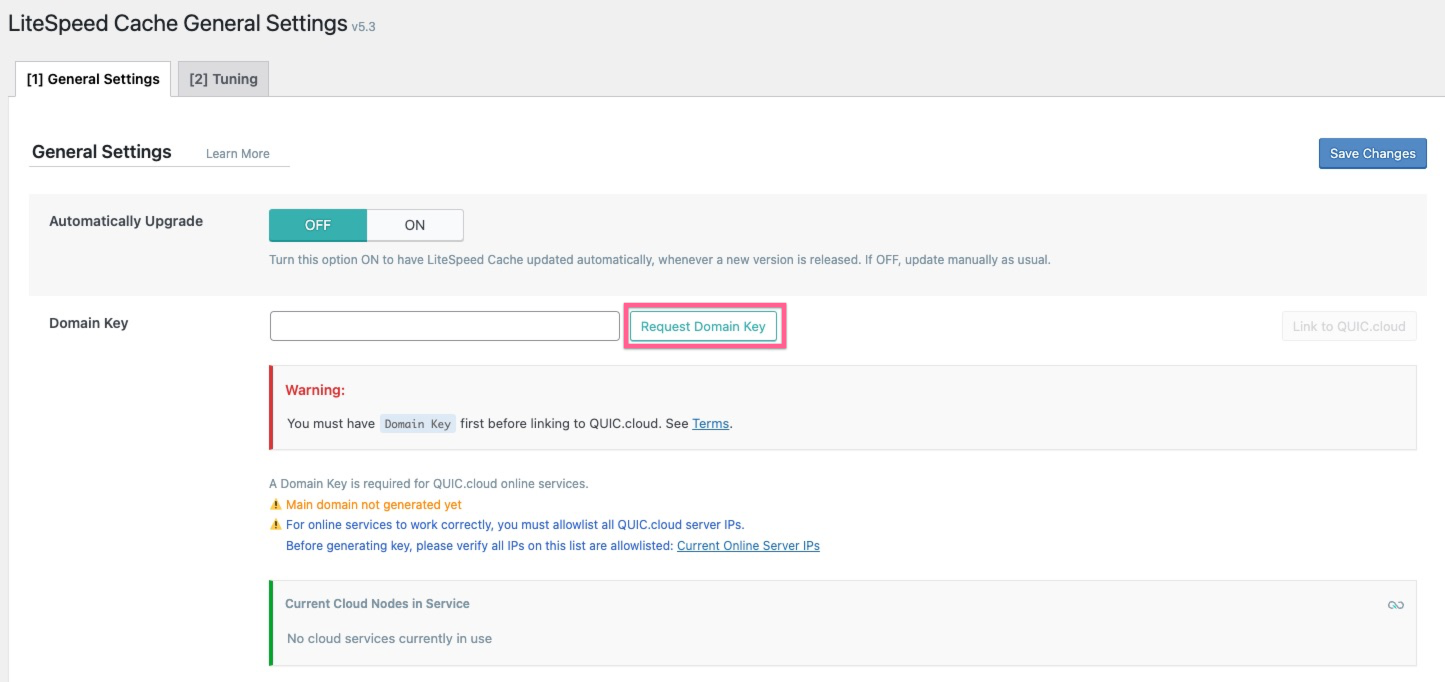
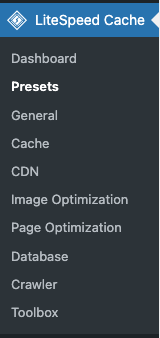
Navigate to the General page in the LiteSpeed Cache menu.

-
Click Request Domain Key.
-
A request is sent to LiteSpeed to generate a unique key for your site. You will see a confirmation message.

-
Refresh the page. If the key has been generated, you will see asterisks in the domain key field.
Step 4: Register for QUIC.cloud (optional)
QUIC.cloud is a Content Delivery Network (CDN) and online services platform for WordPress, created by the LiteSpeed Technologies team. It powers advanced optimisation features such as image optimisation and Critical CSS generation, with the processing handled on LiteSpeed's servers. For more details, see QUIC.cloud's FAQ.
QUIC.cloud is a paid service, but both the CDN and online services have a free tier. As a Kualo customer, you automatically receive the following free allowance each calendar month:
| Service | Free allowance |
|---|---|
| CDN data transfer | 10 GB |
| Image optimisation requests | 10,000 |
| Page optimisation requests | 2,000 |
| Placeholder image generation requests | 1,000 |
The 10 GB monthly CDN allowance may not be sufficient for most websites without incurring additional cost. The online services quotas (image and page optimisation, placeholder generation) are usually sufficient unless you have a very large number of pages or images. We recommend registering even if only for online services - the CDN is disabled by default unless you specifically enable it.
If your website has an international audience, the CDN can dramatically improve load times for global visitors. You do not need to supply payment details to register and use the free tier.
-
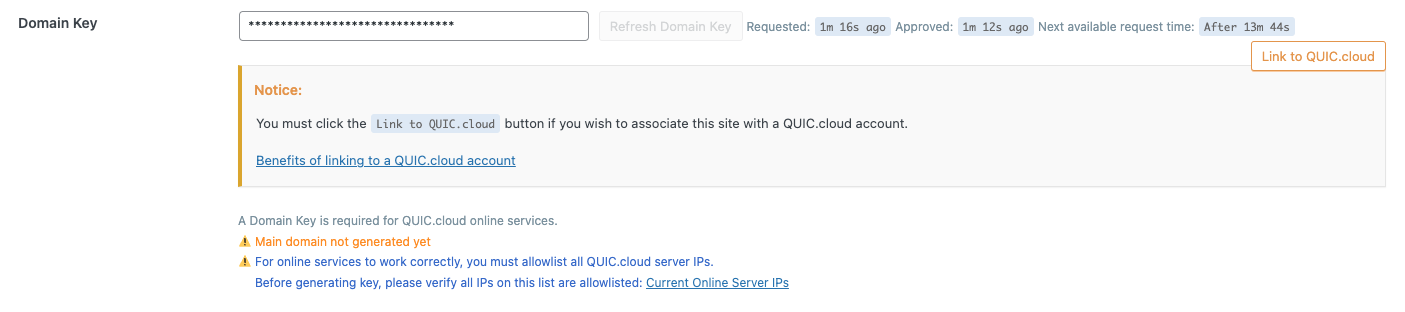
Click the Link to QUIC.cloud button in the LiteSpeed Cache plugin.

-
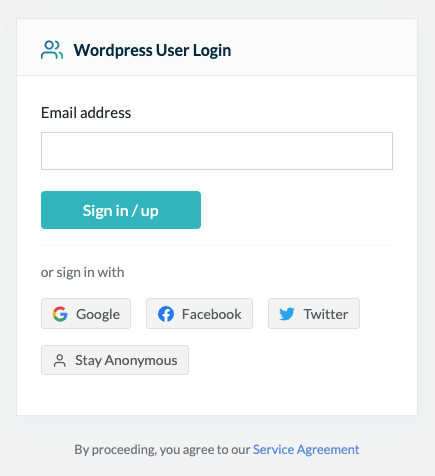
You will be directed to the QUIC.cloud website to register.
-
Enter your email address or sign in using one of the single sign-on options.
-
Complete registration, then return to the plugin and click the Link to QUIC.cloud button again. Once linked, the button will update.

-
Click the button to access your QUIC.cloud dashboard. Select your website to see an overview of your current usage.
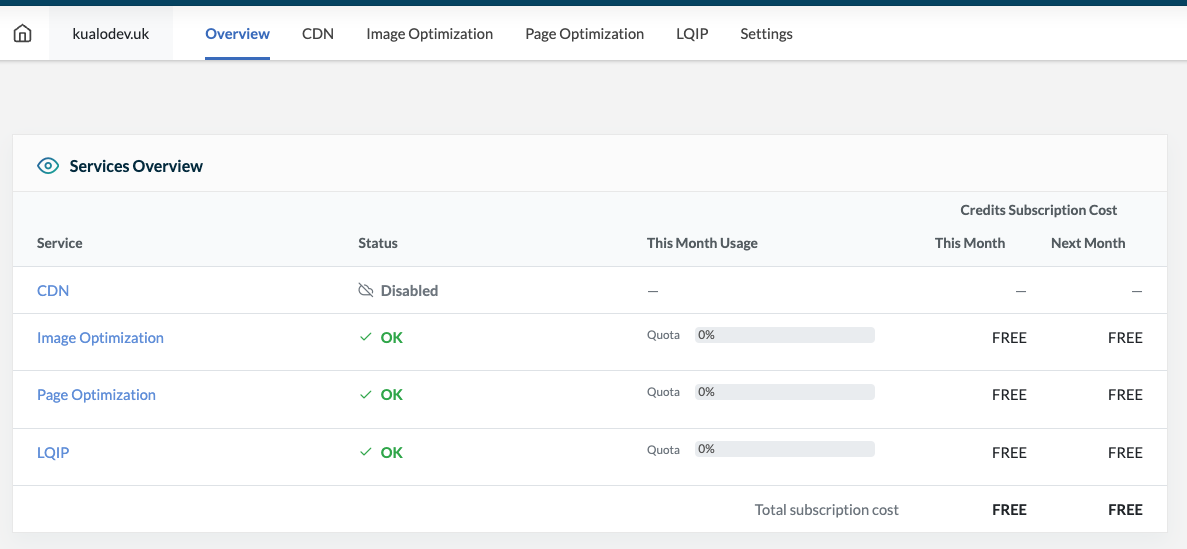
-
Use the tabs at the top to see a breakdown of usage in each area, along with the free tier quotas applied.
Step 5: Turn on LiteSpeed Cache
For most users, the simplest way to get started is to apply one of the built-in configuration presets.
-
Navigate to the Presets page in the LiteSpeed Cache menu.
-
You will see a table of preset options with descriptions of what each one does.
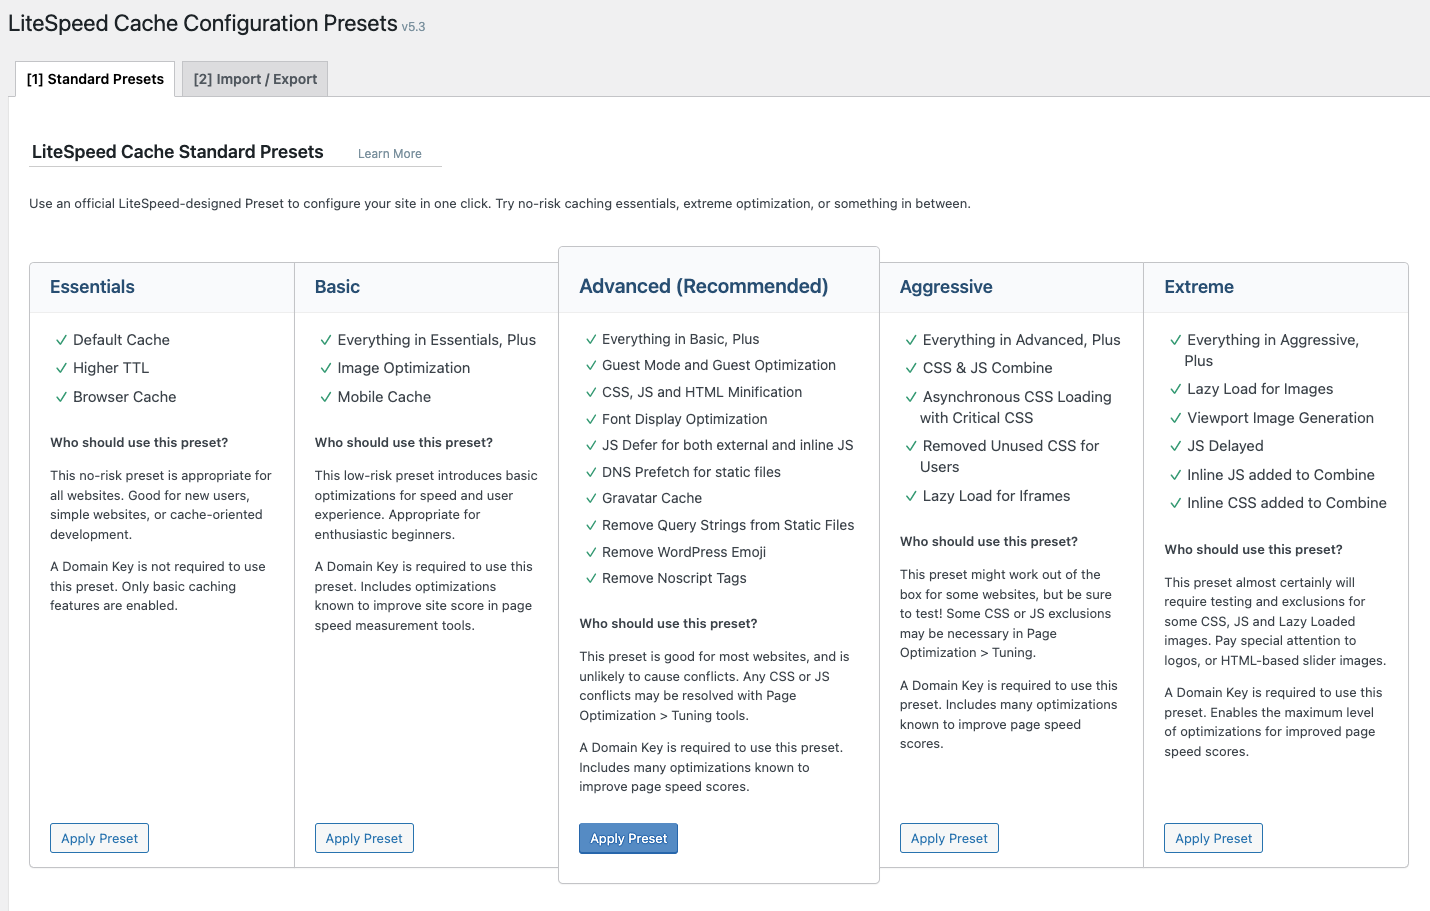
To apply any preset properly, you must first have requested your domain key. Some features such as image optimisation will also require a linked QUIC.cloud account.
Some presets may not be compatible with your site without further tweaking:
- Essentials - no risk; will not cause breaking changes.
- Basic - low risk; unlikely to cause breaking changes.
- Advanced - medium risk; unlikely to cause conflicts, but CSS or JS issues are possible and may need resolving.
- Aggressive and Extreme - almost certain to cause conflicts that will require fine-tuning.
If you are configuring LiteSpeed Cache on a live production website, we suggest starting with Essentials or Basic. Only proceed with Advanced or higher if you are working on a staging site, or if you are comfortable resolving any display or functionality issues that may arise.
If you prefer to understand every feature, start with Essentials and then review and test options one at a time.
When you apply a preset, LiteSpeed Cache takes a backup of your current configuration so you can revert if something breaks.
Step 6: Check LiteSpeed Cache is working
Once caching is enabled, verify that LiteSpeed Cache is actually caching your pages before moving on to a visual check.
-
Go to https://check.lscache.io.
-
Enter your website URL and press Check.
-
The result will indicate whether LiteSpeed Cache is supported and whether there is a cache hit.
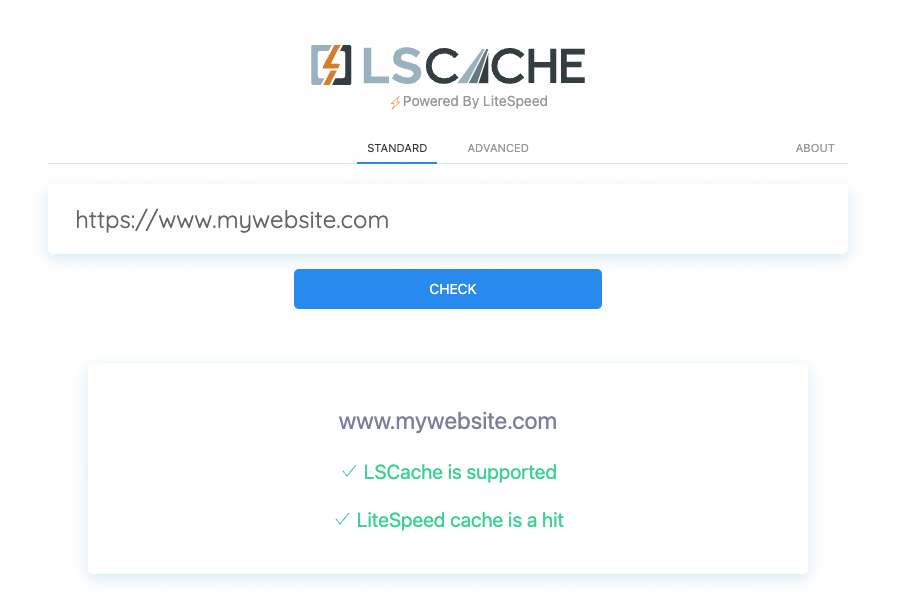
If everything is working, the output should show both supported and a cache hit. If you do not get a cache hit, run the check again - it may be that no one has accessed the site since you enabled caching.
If you continue not to get cache hits, review LiteSpeed's troubleshooting guides for further help. If that does not resolve it, feel free to contact us.
Step 7: Test your website is working as expected
Now that LiteSpeed Cache is running, test that your website looks and functions correctly.
If you chose an Essentials or Basic preset, the site will most likely load without issues. If you chose a higher-level preset, you may encounter some problems.
We suggest testing:
- That the site looks and loads as expected.
- That forms are functional.
- If you run an e-commerce site, that the order and checkout process works correctly.
- That any pages with highly dynamic or user-specific content are loading as expected.
If things are not working as expected on a production site, consider switching to a lower preset and testing again. If you are on a staging site or are happy to work through any issues, the next steps cover configuration in detail.
For the purposes of this guide, we have selected the Advanced configuration.
Step 8: Cache configuration
-
Open the Cache link in the LiteSpeed Cache plugin menu.

-
You will arrive at the LiteSpeed Cache Settings page, which contains a number of tabs.
The first four cache tabs
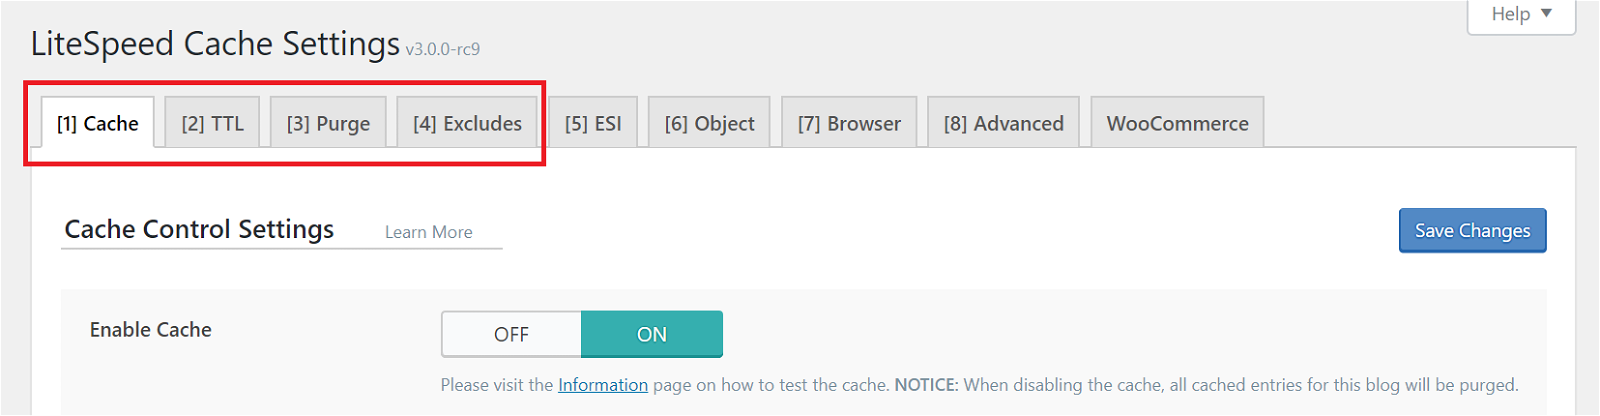
Cache tab
The first option turns caching on and off. The remaining settings let you decide what types of content are cached.
For most sites, leave all items enabled except "Cache Mobile", assuming your site is responsive (i.e. it automatically adjusts to different screen sizes).
See LiteSpeed's documentation for a detailed explanation of each option.
TTL tab
TTL stands for "Time to Live" - the number of seconds a page can remain in cache before it is considered stale and purged.
LiteSpeed uses separate caches for logged-out and logged-in users:
- Public cache (logged-out users): default TTL is 604800 seconds (1 week). This is a sensible default, though you can increase it if you want pages to stay cached longer.
- Private cache (logged-in users): default TTL is 1800 seconds (30 minutes). Entries are stored per IP and session ID, so there is no risk of one logged-in user seeing another's content.
If you edit a page in the WordPress admin, that page is automatically purged from cache - you do not need to worry about visitors seeing stale content.
For a high-level explanation of how caching and purging works, this LiteSpeed blog post is a good starting point. There is rarely a need to change the TTL settings, but LiteSpeed's documentation covers all options in detail.
Purge tab
Sometimes pages need to be purged before their natural expiration - for example when content changes or when you upgrade WordPress. This section lets you define the rules for that behaviour.
If you publish a new post tagged "brownies" in the "recipes" category, several pages change: the home page, the recipes category archive, the brownies tag archive, your author archive, and possibly others depending on your theme. All affected pages need to be purged to avoid serving stale content. These settings let you adjust the purge rules to suit your site.
The default selections work for most sites. See LiteSpeed's documentation if you need to customise them.
Excludes tab
Use these options to exclude specific parts of your site from being cached. For most sites there is no need to change these settings, but they are available for custom exceptions. See LiteSpeed's documentation for details.
The other cache tabs
The remaining tabs cover more advanced caching types.
ESI tab
ESI (Edge Side Includes) lets you "punch holes" in public cached content and fill them with private or uncached content - useful for things like shopping cart widgets and personalised greetings. It is disabled by default.
Unless parts of your page are being cached when they should not be, leave ESI off. Enabling it can reduce the effectiveness of caching and should only be used when necessary. Read more on the LiteSpeed blog.
Object tab
This tab controls an external object cache (Memcached or Redis). Kualo supports both Redis and Memcached on certain plans.
If your plan supports it, configuring object caching is well worth doing. It can significantly improve backend speed and can help with aspects of front-end performance that page caching alone cannot address. We recommend Redis over Memcached for best performance.
See our separate articles on how to enable Redis in cPanel and how to integrate Redis into WordPress. If Redis is not available in your cPanel, your current plan may not include it - get in touch and we can advise.
Browser tab
Browser cache stores static files (such as images) locally on the visitor's device after the first request. Subsequent visits pull those files from local storage until the cache expires.
Enable this only once your site is in production and you are confident you will not be replacing existing images or making changes to static CSS or JS files, as visitors' browsers will not request a fresh copy until the cache period expires.
You can force a fresh request by holding Shift and reloading the page in your browser.
See LiteSpeed's documentation for full details.
Advanced tab
There is usually nothing to configure here unless you know what you are doing. The exception is if you have multiple WordPress installations running in sub-folders (not separate subdomains or domains). See LiteSpeed's documentation for more information.
That covers the caching component of LiteSpeed Cache. Most of it works out of the box with no configuration needed. If you are happy with your site speed at this point, you can stop here. If you want to go further, read on for more advanced in-page optimisation - it can be a more time-intensive process depending on how far you want to take things.
Step 9: Page optimisation
Page optimisation is about improving the efficiency of the code itself. When properly configured, these options can considerably improve load speed, help you achieve high PageSpeed scores (Google's measure of a well-optimised site), improve user experience, and contribute to a more sustainable website.
However, there be dragons ahead....

Page optimisation features can make your site faster, but misconfiguration can cause your site to display incorrectly or impair functionality. We recommend making these changes on a development or staging copy of your site. Once you are happy with the configuration, you can export and import it into your production site.
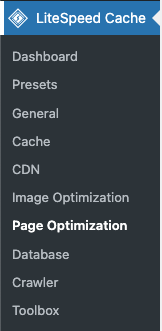
To access page optimisation, select Page Optimizations from the LiteSpeed Cache menu.
Testing your changes
When you change many of these settings, you may not see the results immediately because LiteSpeed is still serving your site from cache. After adjusting each setting, you should:
-
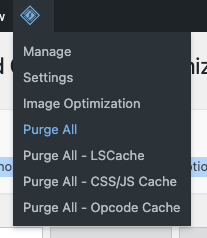
Run the Purge All command via the LiteSpeed menu in the top navigation bar.
-
Open an incognito window in your browser and load your website. In Chrome, go to File > New Incognito Window. Testing in an incognito window ensures you are not logged in to WordPress, so you experience the site as a regular visitor would - which will be faster than the logged-in experience.
After running Purge All, everything cached by LiteSpeed is cleared. The first page load may be slower as PHP generates the content dynamically. Refresh the page to see the cached response.
Change one setting at a time, then purge and test in your incognito browser before moving on.
CSS settings tab
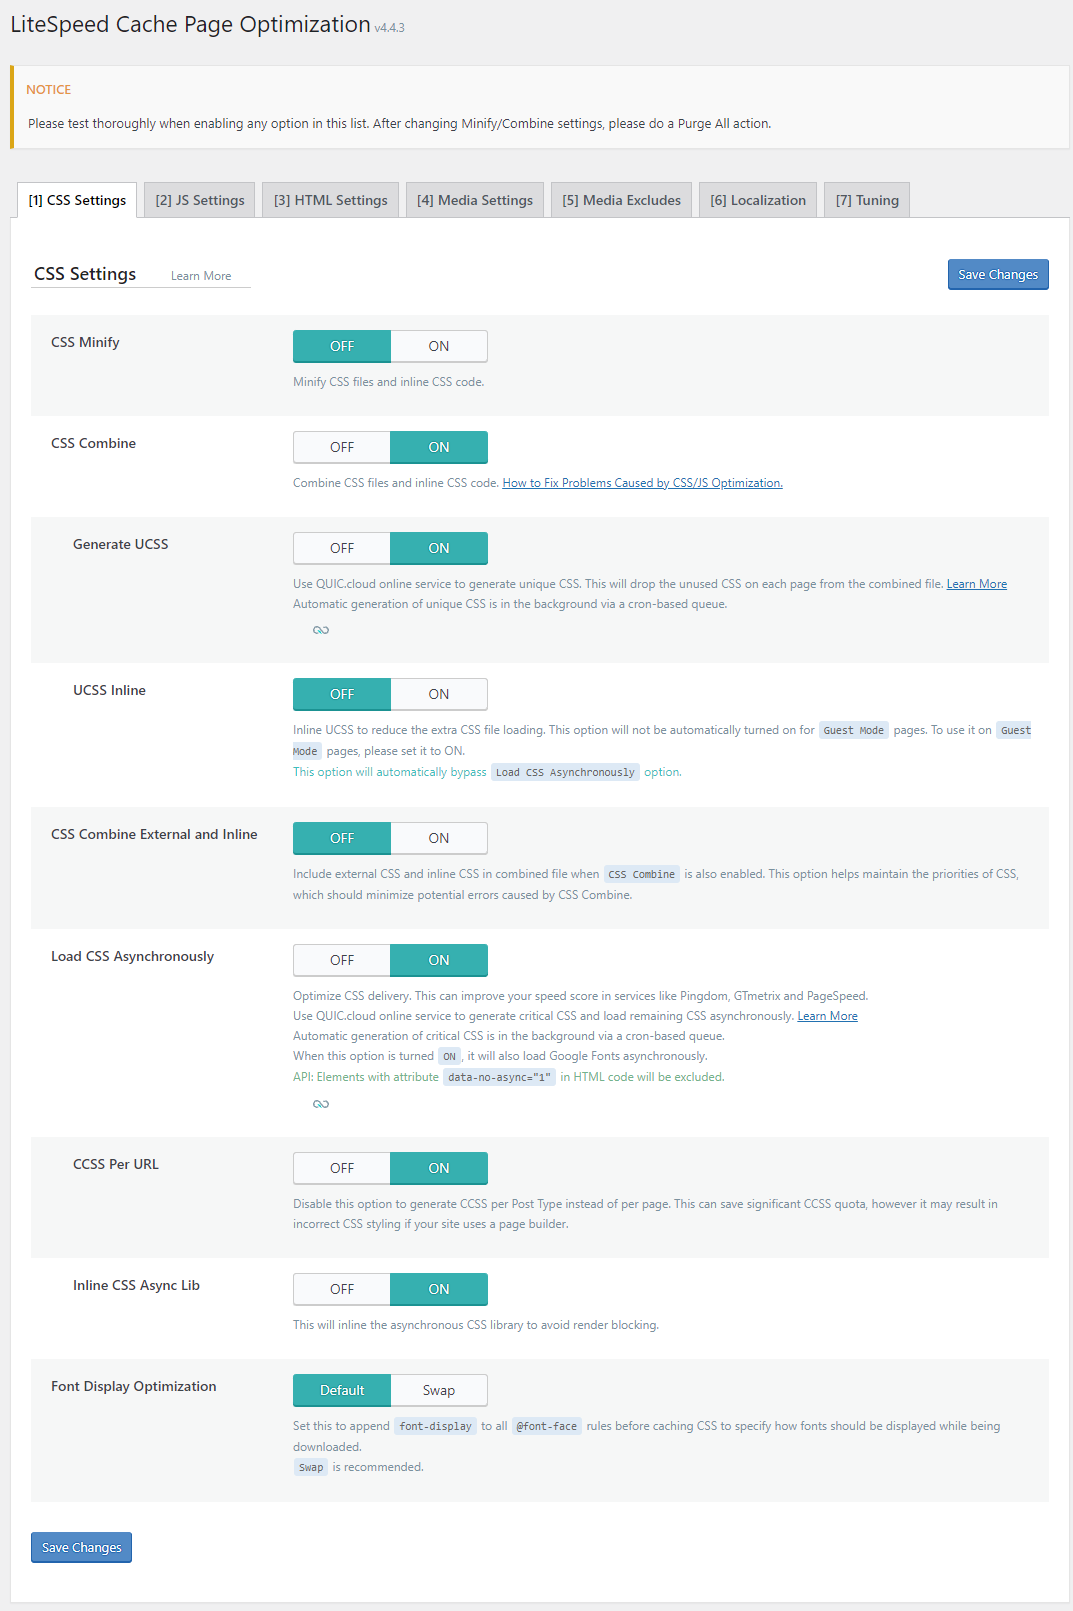
When adjusting CSS settings, run a Purge All to clear existing caches. If you are using Critical CSS or Unique CSS features, these are not cleared by Purge All - you will need to specifically purge UCSS or CCSS if you make changes to how those are generated.
CSS minify
This strips unnecessary whitespace, line breaks, and comments from your CSS files, making them smaller and faster to download. It is usually safe to enable and is included in the Advanced preset and above.
CSS combine
This merges all individual CSS files into a single file. We recommend keeping this OFF because:
- Merging CSS can sometimes cause display problems.
- On our servers, it is often faster to serve separate CSS files when your site uses HTTPS.
When your site runs over HTTPS, files are transferred using HTTP/2 (or HTTP/3 where the visitor's browser supports it). These protocols support asynchronous file transfers, meaning multiple files can be delivered to the browser simultaneously. It is usually faster to send many small files than one large one.
If your site is showing an Insecure warning in the browser address bar, we strongly suggest converting it to HTTPS - it will load significantly faster.
Generate UCSS (Unique CSS)
This is an advanced feature that can cause visual display issues requiring tuning to resolve.
QUIC.cloud required. This feature requires a generated domain key and a linked QUIC.cloud account. It is also recommended that you have an actual cron job set up so that UCSS can be generated in the background.
Remember when we said not to combine CSS? Here is the exception - and for good reason.
Unique CSS (UCSS) is a QUIC.cloud service that works alongside the CSS Combine setting to create a single streamlined CSS file for each page of your site. That combined file will only include the CSS needed to render that specific page, keeping file sizes small and reducing processing time. For more details, see LiteSpeed's introductory article on UCSS.
Display problems after enabling UCSS? UCSS is generated by analysing the CSS selectors present in the page HTML. This works in the vast majority of cases, but some selectors may only appear after a user scrolls or after a JavaScript action runs. If you see display issues, identify which selectors are missing from the initial HTML and add them to the UCSS Whitelist. See this LiteSpeed article for debugging guidance.
UCSS inline
This embeds your Unique CSS directly in the HTML. We recommend keeping this OFF - it is usually more efficient to load CSS as a separate file.
CSS combine external and inline
Since we do not generally recommend combining CSS (unless you are using UCSS), keep this OFF. If you are using UCSS, inline styles are likely unique to each page anyway.
Load CSS asynchronously
This is an advanced feature that can cause visual display issues requiring tuning to resolve.
QUIC.cloud required. This feature requires a generated domain key and a linked QUIC.cloud account. It is also recommended that you have an actual cron job set up so that Critical CSS can be generated in the background.
Under normal circumstances, a browser loads CSS before HTML, so that it knows how to style the content as it renders. Forcing CSS to load first creates a delay.
This setting allows CSS to load asynchronously - delivered at the same time as the HTML - which can significantly improve your PageSpeed score.
The problem is that the page may start rendering before all CSS has downloaded, causing a Flash of Unstyled Content (FOUC): the page loads without styling, then re-adjusts when the styles arrive.
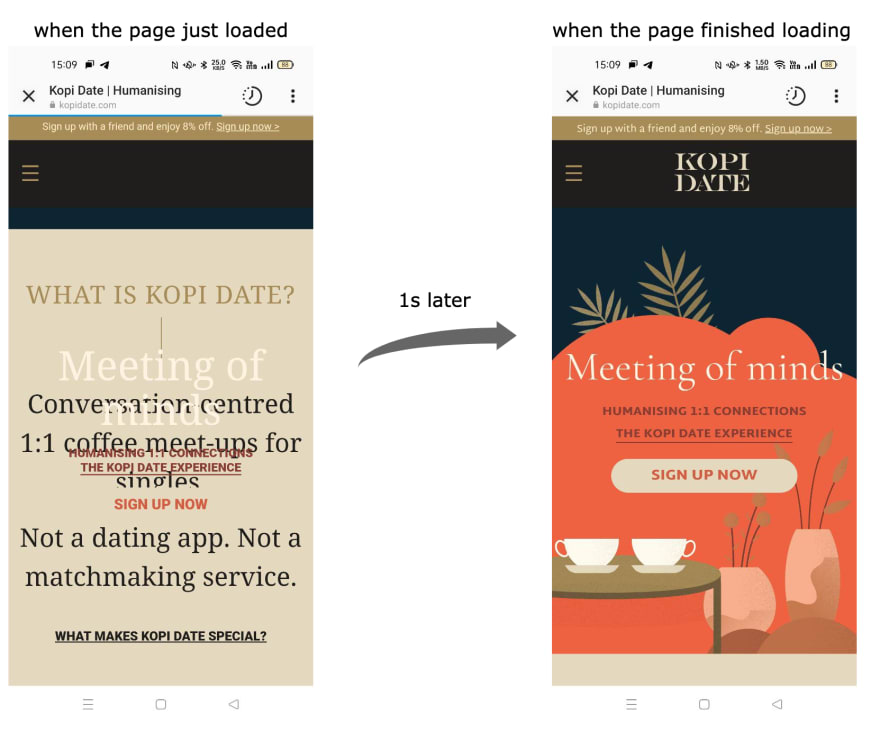
To prevent this, LiteSpeed automatically generates Critical CSS - the styles needed to display above-the-fold content. These are inserted inline into the HTML and processed alongside it, eliminating the FOUC.
You can read more about asynchronous CSS delivery, Critical CSS, and FOUC on the LiteSpeed blog.
Still seeing a FOUC? Critical CSS takes time to generate and may only be created when the WordPress cron runs. Some CSS rules may not be visible in the initial HTML and may need to be added manually. If you still see a FOUC, read LiteSpeed's documentation on resolving FOUC issues.
CCSS per URL
By default, LiteSpeed generates Critical CSS per post type (one file per page, post, or product type). Enabling this option generates Critical CSS for each individual URL.
Only turn this on if you have dramatically different styling per page. For most sites it is not necessary.
This option can cause issues with page builders. If your site uses a page builder, this may cause display problems.
Inline CSS async lib
We generally recommend keeping this OFF - it can cause font display issues in most cases.
Font display optimisation
We suggest setting this to DEFAULT. Setting it to SWAP can cause font appearance to change visibly during page load.
JS settings tab
These settings can cause issues on some sites. As with CSS settings, proceed on a development site or be prepared for possible functionality or display issues. You can always revert a setting if problems arise.
JS minify
Removes unnecessary whitespace, line breaks, and comments from JS files. It is usually safe to enable and is on by default in the Advanced preset. It reduces file sizes, speeds up downloads, and improves your PageSpeed score.
JS combine
As with CSS combine, provided your site runs over HTTPS, we recommend keeping this OFF. It is usually faster to serve individual files on our servers.
JS combine external and inline
If you do want to combine JS into a single file, this option also includes inline JS in that file, which can reduce some combining-related problems. We would generally recommend keeping this OFF.
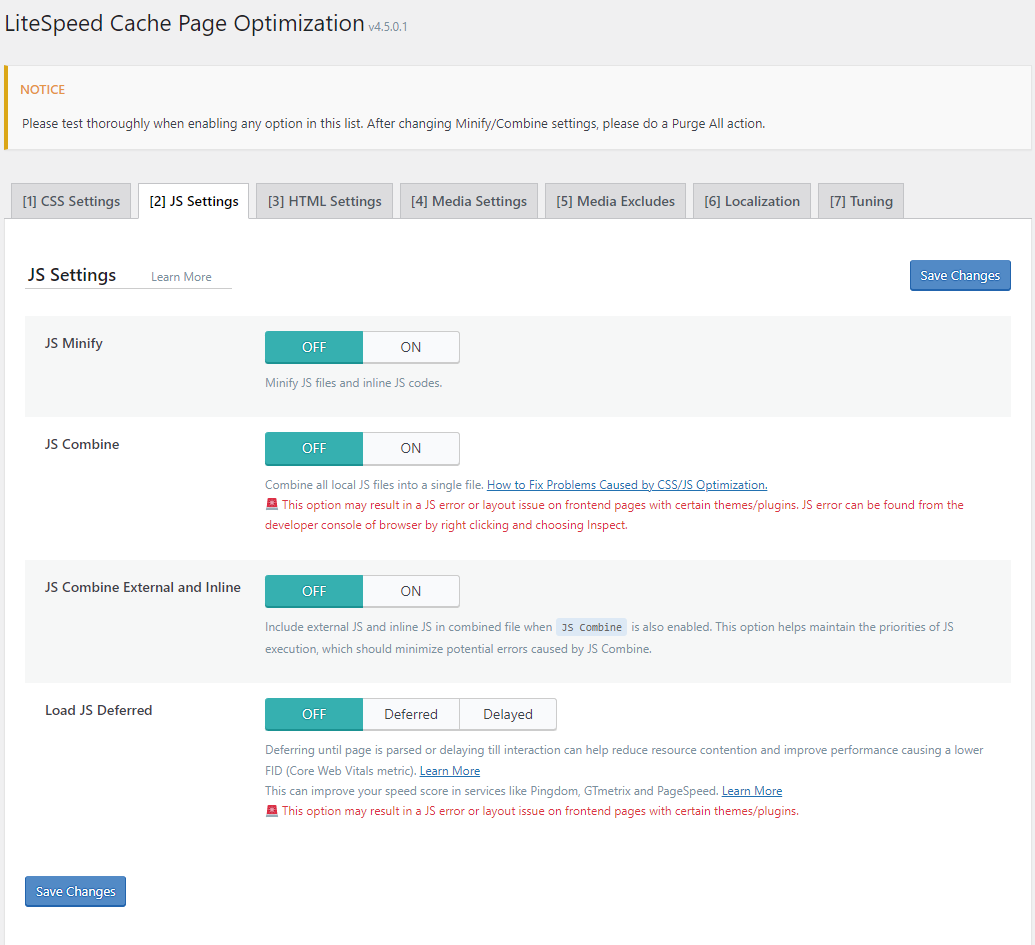
Load JS deferred
This option can have a significant impact on your PageSpeed score, but can also cause problems on some sites. Enabling it can eliminate or greatly reduce the "Eliminate Render Blocking Resources" warning in your PageSpeed report.
Both the Deferred and Delayed options hold all JavaScript processing until after the HTML has finished loading:
- Deferred runs JS as soon as the HTML finishes loading.
- Delayed runs JS only when user activity is detected (such as a key press or mouse movement).
Both options improve page speed scores, but Delayed has greater potential as it effectively removes JS from the PageSpeed score calculation entirely.
Test all functionality on your site thoroughly after enabling this option.
If your site has issues after enabling these options: The problem is often caused by one particular JS file being deferred, while the rest can safely be deferred. LiteSpeed Cache lets you exclude specific JS files from deferral. See LiteSpeed's detailed documentation on how to do this.
HTML settings tab
HTML minify
As with CSS and JS minification, this removes unnecessary code from your HTML. It is usually safe to enable.
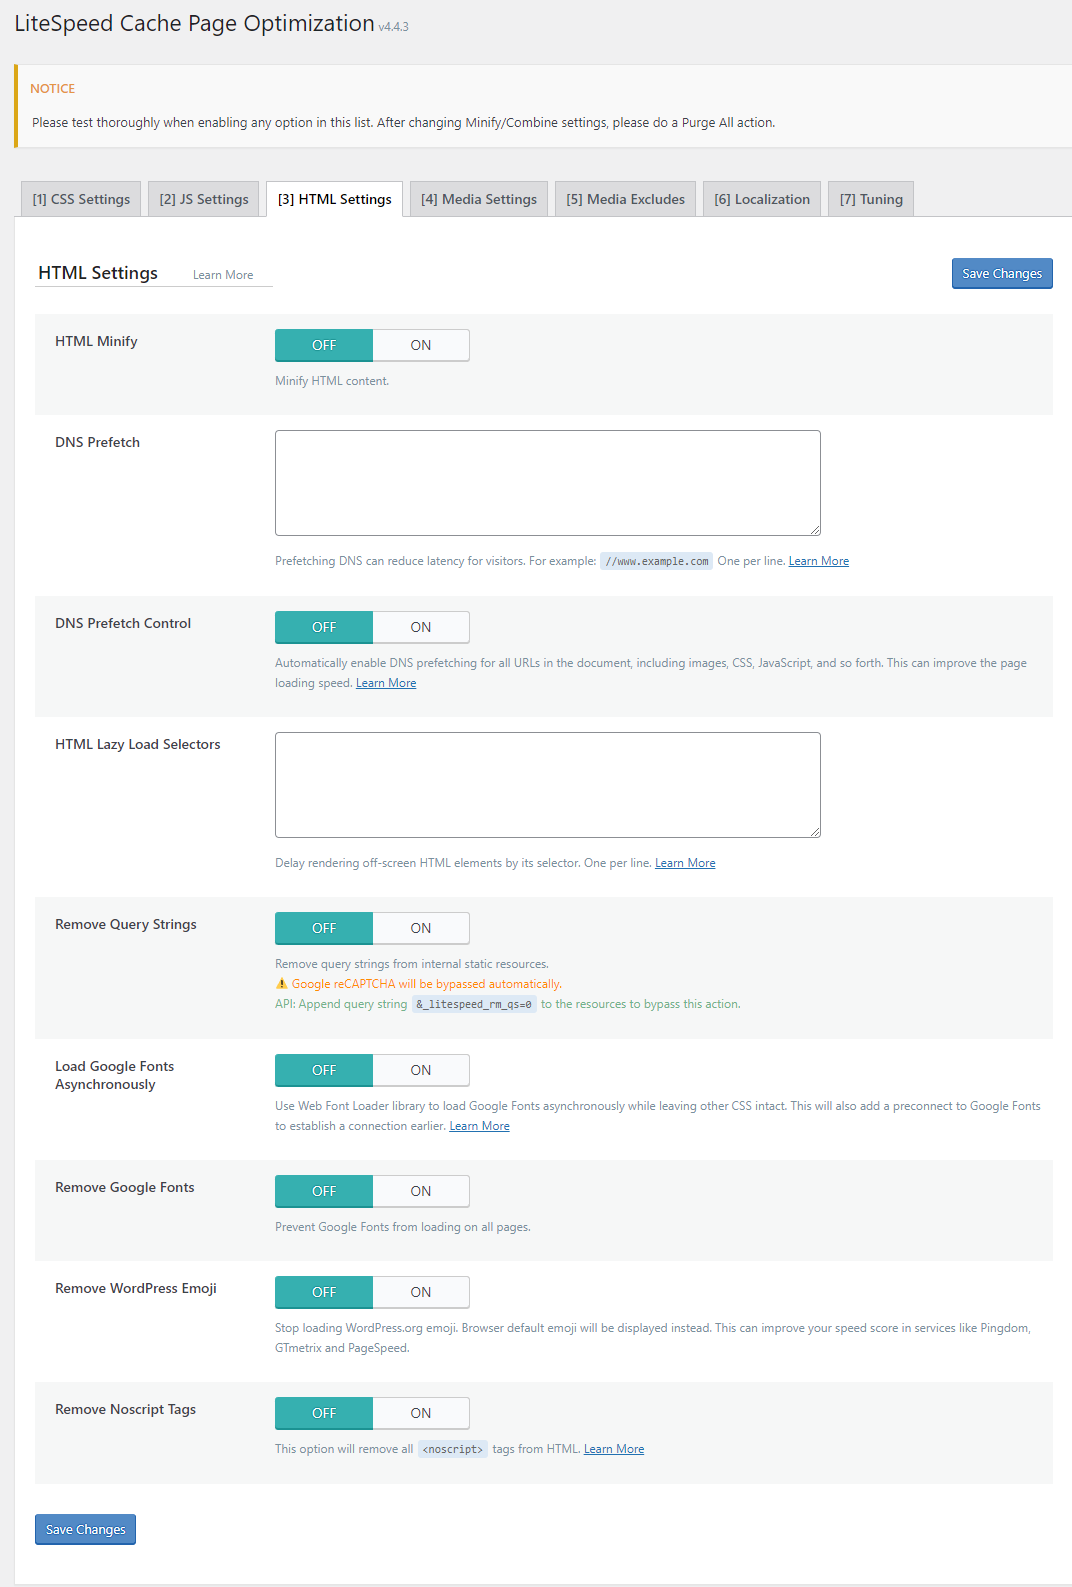
DNS prefetch and DNS prefetch control
Your website may load resources (JS, CSS, fonts) from external domains. Normally, the browser performs a DNS lookup to find the IP address for each domain when the resource is requested. On mobile connections, this can add noticeable delay.
These settings instruct the browser to pre-fetch DNS for external domains before the resource is actually requested - a bit like saving a number in your phone's address book rather than looking it up in a directory each time.
-
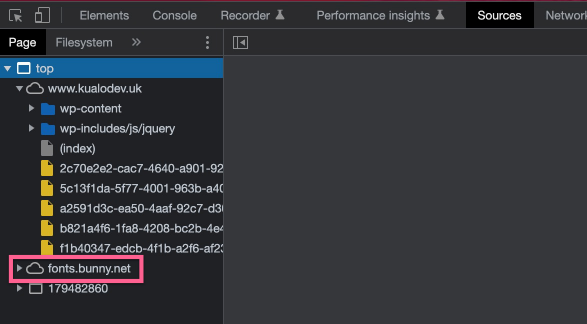
DNS Prefetch lets you specify a list of domains to pre-fetch. To find which external domains your site uses, open Chrome Developer Tools in an incognito window, load a page, and check the Sources tab. Resources with a cloud symbol (excluding your own domain) come from third-party domains.
Enter domains in the format
//fonts.bunny.netor//www.myresource.com. -
DNS Prefetch Control automatically pre-fetches DNS for all external domains found in your HTML source, without needing to specify them manually.
We recommend turning on DNS Prefetch Control - it will not cause any harm to your page. For more details, see MDN's documentation on X-DNS-Prefetch-Control.
HTML lazy load selectors
If you have very long pages, you may be loading HTML that visitors will never reach because they do not scroll that far. HTML Lazy Load Selectors let you defer rendering of that HTML until the visitor scrolls close to it, reducing initial page weight and improving your PageSpeed score.
Use this carefully - do not specify HTML that appears above the fold.
To identify selectors:
- Open Developer Tools in an incognito window and use the Inspector tool to locate the element you want to lazy load.
- Select the most appropriate parent element (usually a
divorsection) rather than a child element. - Right-click it in the code and press Copy Selector.
- Paste the selector into the HTML Lazy Load Selectors field.
Good candidates include your footer or comments section, which typically appear well below the fold.
Remove query strings
This removes query strings from static resources (for example, ?version=1234 appended to a CSS file), improving how well those resources can be cached. It is generally safe to use.
If a static resource genuinely requires a query string, you can preserve it by appending &_litespeed_rm_qs=0 to that resource's URL. You may need to edit this in the theme itself.
Load Google Fonts asynchronously
This can improve PageSpeed scores but may cause fonts to display and then visibly change after the page loads. LiteSpeed automatically adds a pre-connect to Google to minimise this delay, but if you find the effect too jarring - particularly for fonts above the fold - you may prefer to keep this OFF.
Remove Google Fonts
This completely removes Google Fonts from your site, which improves speed and PageSpeed scores but will cause font display issues if you do not have a local copy of the font. Keep this OFF unless you know what you are doing, or you are not actually using Google Fonts but they are being included by a plugin or theme.
Remove WordPress emoji
This is usually safe to turn ON. The vast majority of users are on modern browsers that display emoji natively, so the WordPress emoji script is redundant. Turning it off means visitors on very old browsers may not see emoji in comments or posts.
Remove noscript tags
This is usually safe to turn ON. These tags exist for compatibility with browsers that do not support JavaScript, which are now extremely rare. Removing them helps reduce redundant code.
Media settings tab
QUIC.cloud required for many features. Make sure you have generated your domain key and linked your QUIC.cloud account. It is also recommended that you have an actual cron job set up so that images can be optimised in the background.
The Media Settings tab is where you optimise images and embedded content. It is one of the most important sections for achieving a high PageSpeed score.
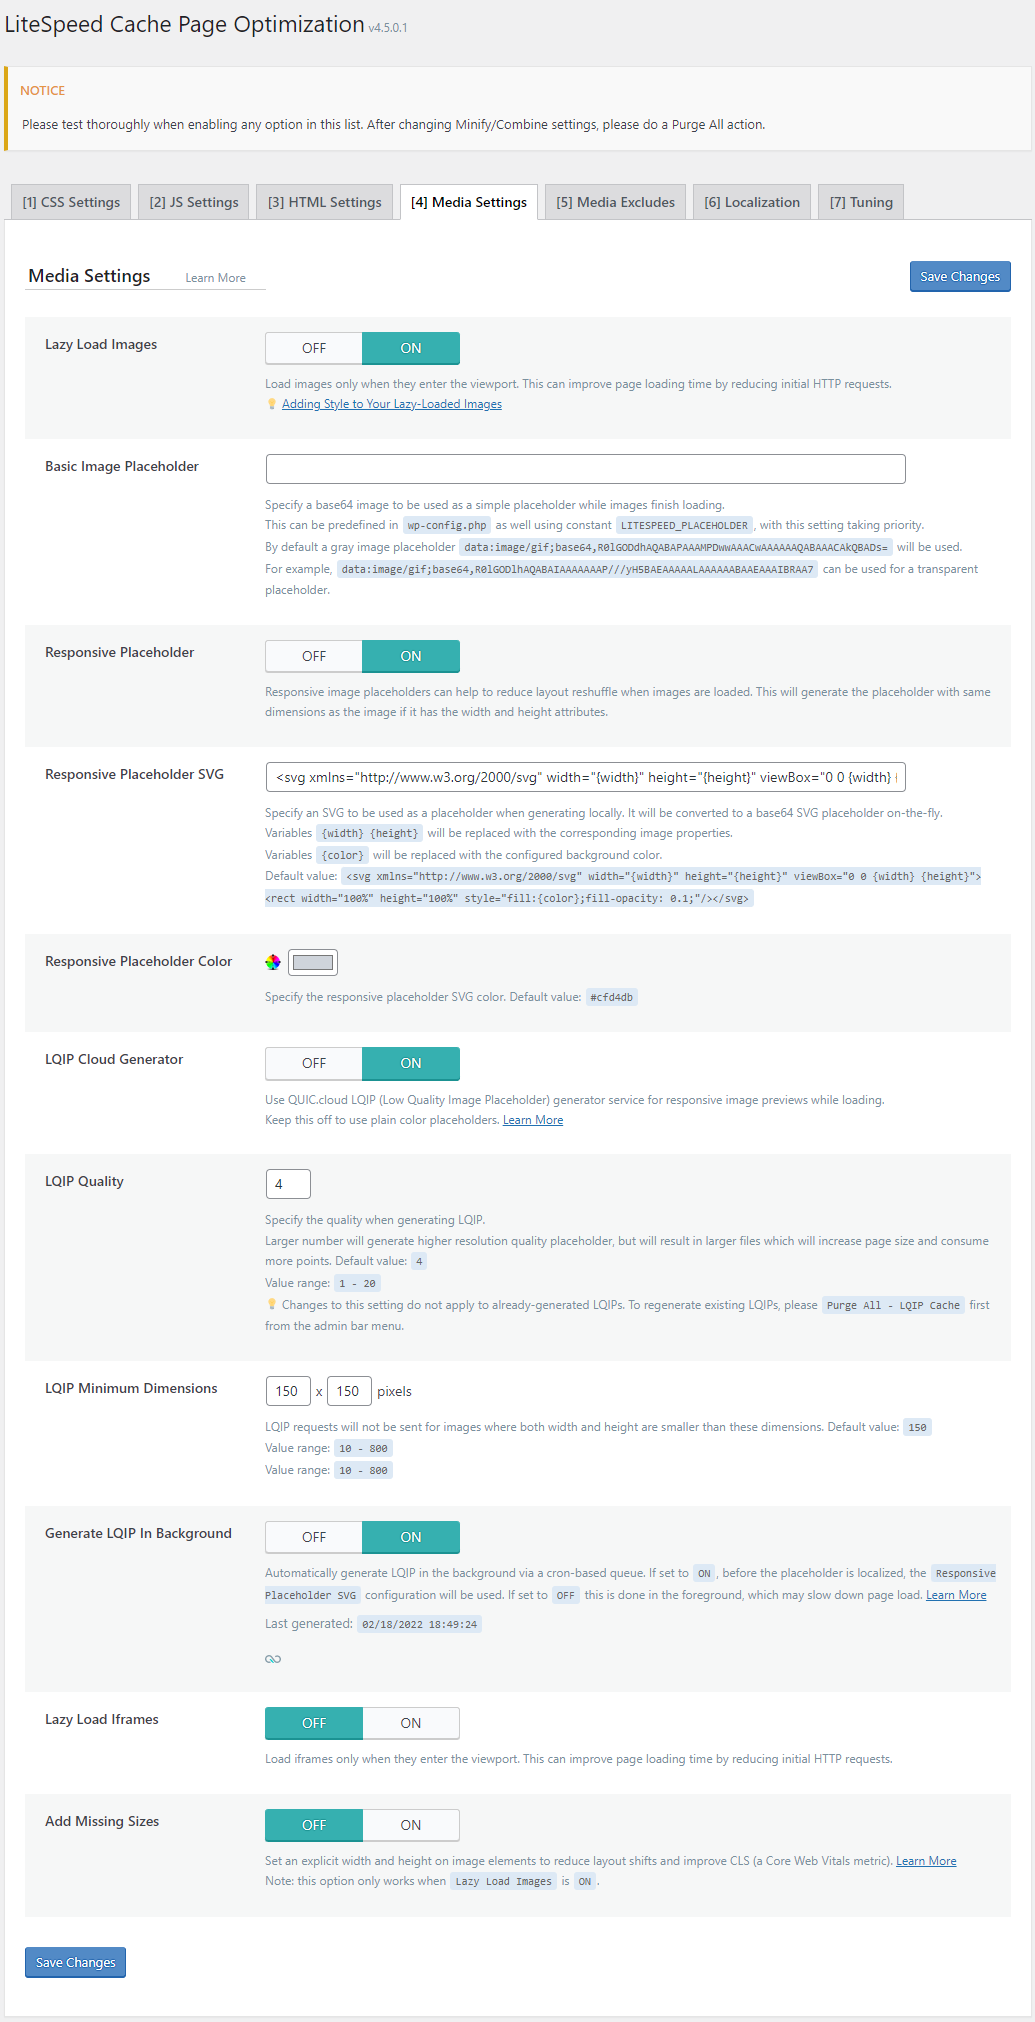
Lazy load images
Without lazy loading, every image on your page is requested from the server regardless of whether the visitor ever scrolls far enough to see it. Lazy loading means images are only requested just before they enter the visitor's viewport, making your site lighter and reducing unnecessary data transfer.
We recommend turning this ON, but you will need to exclude above-the-fold images from lazy loading to avoid PageSpeed penalties.
The easiest way to handle this automatically is via the VPI tab:
- Viewport Images: Set to ON - this automatically excludes above-the-fold images from lazy loading.
- Viewport Images Cron: Set to ON - this sends requests to QUIC.cloud to process viewport images via the scheduled cron.
QUIC.cloud required to use the Viewport Images feature. You will also need an actual cron job set up.
Once enabled, you will see a list of URLs queued for processing. You can press the button to process them immediately, or wait for your scheduled cron job to run.

Once processed, lazy loading should work correctly in most cases. You may need to clear all caches to see the effect.
If you still have above-the-fold images being lazy loaded, you can fine-tune exclusions in several ways (see LiteSpeed's blog post for full details):
- Add
data-no-lazy="1"to individual elements. - Add the image path (or a partial match) to Media Excludes > Lazy Load Image Excludes.
- Add a class to images you want to exclude, then add that class to Media Excludes > Lazy Load Image Class Name Excludes.
- Add a class to a parent element (such as your navigation bar or an above-the-fold section), then add that class to Media Excludes > Lazy Load Image Parent Class Name Excludes. Every image within that parent will be excluded.
If a user scrolls very quickly, or if a script auto-scrolls the page, they may see images appear as they load. You can soften this with custom CSS - LiteSpeed provide example CSS code for a fade-in effect.
Basic image placeholder
This lets you specify a placeholder image (as a base64 string) to show before a lazy-loaded image appears. If not specified, a grey image is used. We suggest skipping this setting if you are using QUIC.cloud, as the LQIP feature below is a much better solution.
Placeholder images are only ever seen if a user scrolls fast enough that the image has not yet loaded.
Responsive image placeholder
Turn this ON if you are using lazy load images and are not using QUIC.cloud. It ensures the placeholder image matches the dimensions of the original, preventing layout shifts.
The Responsive Placeholder SVG setting below it lets you supply a custom SVG placeholder. If you leave it as default, a grey image is used. You can also customise the colour using Responsive Placeholder Colour.
If you are using QUIC.cloud, skip this and use LQIP instead.
LQIP cloud generator
If you are connected to QUIC.cloud, this is a much better option than a standard placeholder. Instead of a generic grey image, LiteSpeed generates a very small, low-resolution version of each image to use as the placeholder. Before lazy loading completes, the image appears slightly blurred but recognisable. When the full image loads, it sharpens - often before the user has even scrolled that far.
This overrides the placeholder options above, so there is no need to configure those separately.
- LQIP Quality: Default is 4. Increase this if you want the low-quality images to be less blurry, but keep in mind that higher values increase file size and reduce the benefit of lazy loading.
- LQIP Minimum Dimensions: Default is 150x150 px. LQIP will only be generated for images larger than this threshold, which is sensible.
- Generate LQIP in Background: Set to ON so that LQIP images are generated by your cron job rather than during page execution.
Ensure you have an actual cron job in place so that LQIP images are generated in the background.
Lazy load iframes
Many sites load third-party content in iframes - widgets, YouTube videos, and so on. These can be very heavy. Just as with images, there is no benefit in loading iframe content the visitor may never see.
We recommend enabling this if your site uses embedded video or third-party iframe content. Apply similar exclusion tuning as you did for images, using the Media Excludes > Lazy Load Iframe options.
Add missing sizes
If you are using lazy load images, turn this ON. It explicitly sets width and height on image elements that lack these attributes, helping avoid layout shifts and improving your PageSpeed score. It is usually safe to enable.
Has lazy loading negatively impacted your PageSpeed score?
If your PageSpeed score drops after enabling lazy loading, it is likely because above-the-fold images are being lazy loaded. You may see a warning such as: "Largest Contentful Paint image was lazily loaded." This means images above the fold are being deferred. If you have Viewport Images set to ON but the warning persists, LiteSpeed may not have been able to handle this automatically for your site. Use one of the exclusion methods described above to manually exclude those images.
Localization tab
This tab lets you minimise dependency on third-party resources, reducing the number of external connections your site needs to make.
Gravatar cache
WordPress uses Gravatars to generate user avatars based on email addresses. Caching these reduces lookups to the Gravatar service.
This is safe to turn ON. You can also enable Gravatar generation via cron and adjust the cache duration. The default is 604800 seconds (1 week), but since people rarely update their Gravatar, you could reasonably set this to 3 months (7890000 seconds) or 6 months (15780000 seconds).
Localize resources
This advanced feature lets you use local copies of static resources that would normally be hosted remotely - for example, remotely hosted JS or CSS files. By localising them, you can optimise them directly.
To use this feature, enable it and list the full URLs of the resources you need. LiteSpeed will update your HTML to use local copies.
Test your site thoroughly after making this change.
Localised resources remain local until the cache is cleared. If the vendor updates the source file, your local copy will not update until the cache is purged, which could result in outdated CSS or JS.
Step 10: Image optimisation
QUIC.cloud recommended. To get the most from LiteSpeed's image optimisation, connect your QUIC.cloud account and set up an actual cron job so that optimisation runs in the background. Image optimisation can be used without QUIC.cloud, but images will be processed with much lower priority.
Images uploaded to WordPress are often not well optimised for the web - high-quality originals can add several megabytes to a single page. LiteSpeed's image optimisation features let you optimise existing images and automatically optimise new ones as they are uploaded, without needing to pre-process images in editing software.
Optimised images mean your site will:
- Load faster.
- Transfer less data, making it more sustainable.
Do not use any other image optimisation plugin at the same time as LiteSpeed's image optimisation. This can cause undesirable behaviour or a large duplication of files.
LiteSpeed optimises images on their own servers. Your images are transferred to their processing servers, optimised, and then downloaded back. Images are sent in batches - starting small to verify everything is working, then gradually increasing to batches of up to 200 images. Original images are preserved in case you ever need to restore them.
Image optimisation summary tab
When you first open the Image Optimisation page, you will land on the Summary tab.
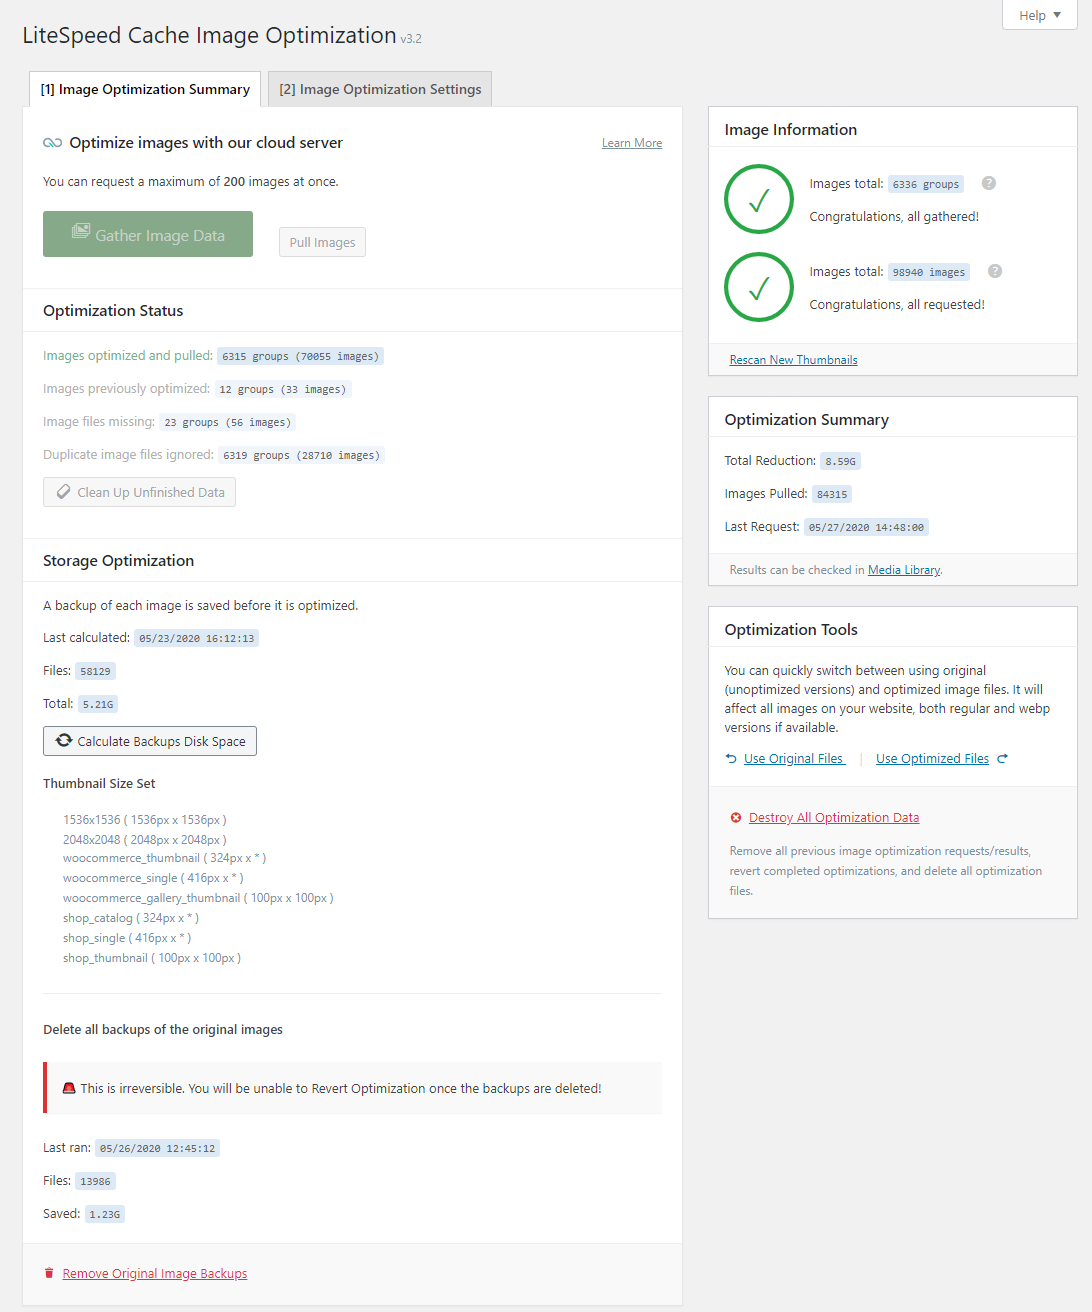
If you have a cron job set up, images will optimise automatically in the background and this page will update to show progress. This page also lets you:
- Switch between optimised and original files.
- Calculate the size of original files and optionally remove them to free up disk space. This is irreversible, so only do this if you are certain you no longer need the originals.
Image optimisation settings tab
Auto request cron / Auto pull cron
Set both to ON and ensure WordPress has a proper cron job in place. Image optimisation involves uploading and downloading files from LiteSpeed's servers, so it must run as a background task. Without a proper cron job, optimisation will happen during page execution and may slow down page loads.
Optimize original images
Set to ON for image optimisation to work.
Remove original backups
We recommend keeping this OFF as a precaution. You may enable it if you are tight on disk space, but be aware that if you need to revert to original images, you will have to re-upload them.
Optimize losslessly
We recommend keeping this OFF to use the default lossy compression. Lossless compression produces no visible change in quality but results in much larger file sizes. Lossy compression still produces great-looking images with significantly smaller file sizes.
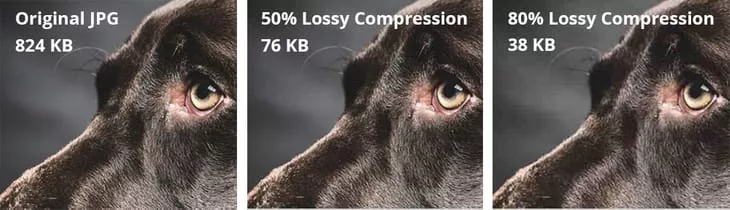
You can also control the compression ratio using the WordPress Image Quality Control setting further down the page. The default is 82%. Lowering this reduces file size further, but image quality may degrade if you are using lossy compression.
Preserve EXIF/XMP data
Set to OFF to strip unnecessary metadata from images, such as GPS location data. You almost certainly do not need this data, and it only increases file sizes.
Image WebP replacement
WebP is a modern image format that produces significantly smaller file sizes. Enabling this option causes LiteSpeed to create WebP versions of your images, which are served to browsers that support the format.
You can read more about WebP on Google's WebP page.
If you already had image optimisation set up before enabling WebP, previously optimised images will not be converted automatically. You will need to destroy all optimisation data and start over.
Because WebP is not supported by all browsers, LiteSpeed creates a cache variant for WebP-capable browsers and a separate variant for older browsers. This ensures that WebP images are never delivered to a browser that cannot display them.
See LiteSpeed's documentation for full details on WebP and how to verify it is working.
Step 11: Set up the LiteSpeed crawler
LiteSpeed can only cache a page when it is first accessed by a visitor. If you purge your cache, content updates invalidate cached pages, or a cached page expires, the next visitor to that page will trigger a fresh PHP render.
To minimise the chance of a visitor landing on an uncached page, LiteSpeed includes a built-in crawler that keeps your cache warm. This is particularly useful for sites with many pages, frequently changing content, or low visitor numbers.
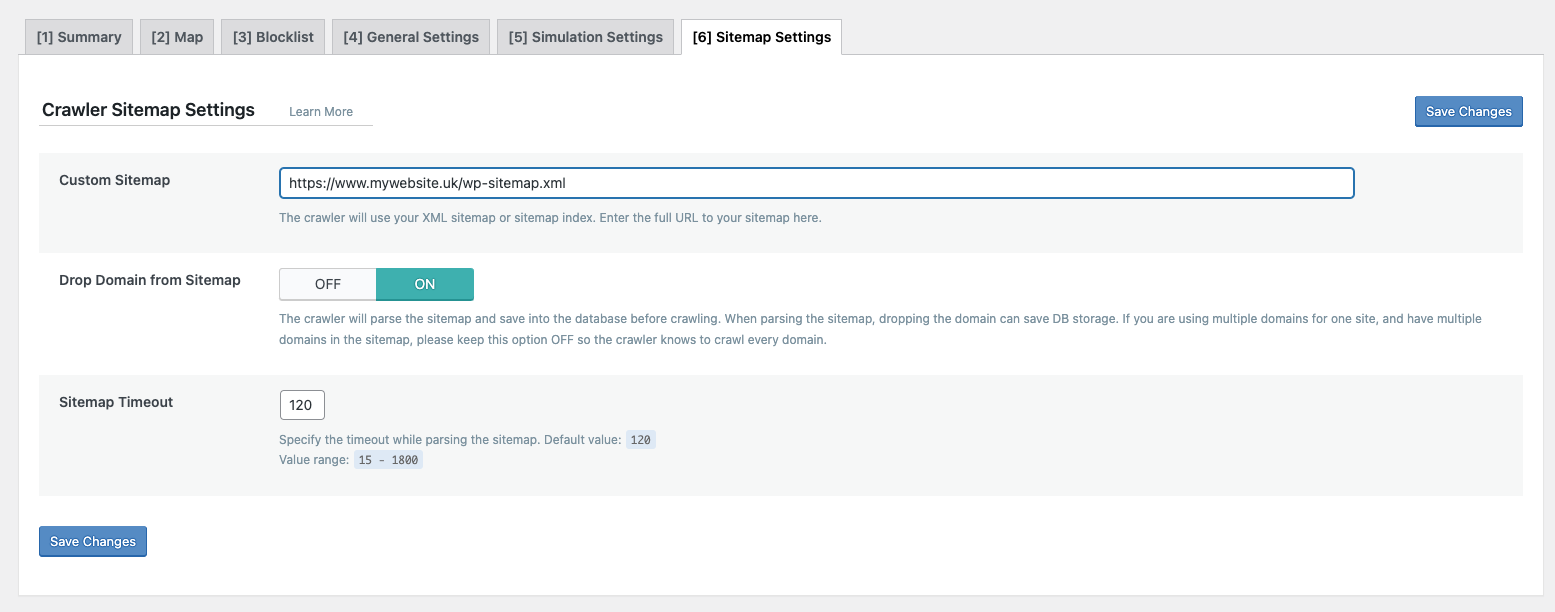
The crawler requires your site to have a sitemap. WordPress includes a default sitemap at https://www.yourdomain.com/wp-sitemap.xml, though an SEO or sitemap plugin may place it at a different URL. Check your browser to confirm the sitemap location.
-
Go to the Sitemap Settings tab and enter your sitemap URL, then click Save Changes. Drop Domain can be set to ON unless you run multiple domains for one site. Sitemap Timeout can be left at 120 seconds.
-
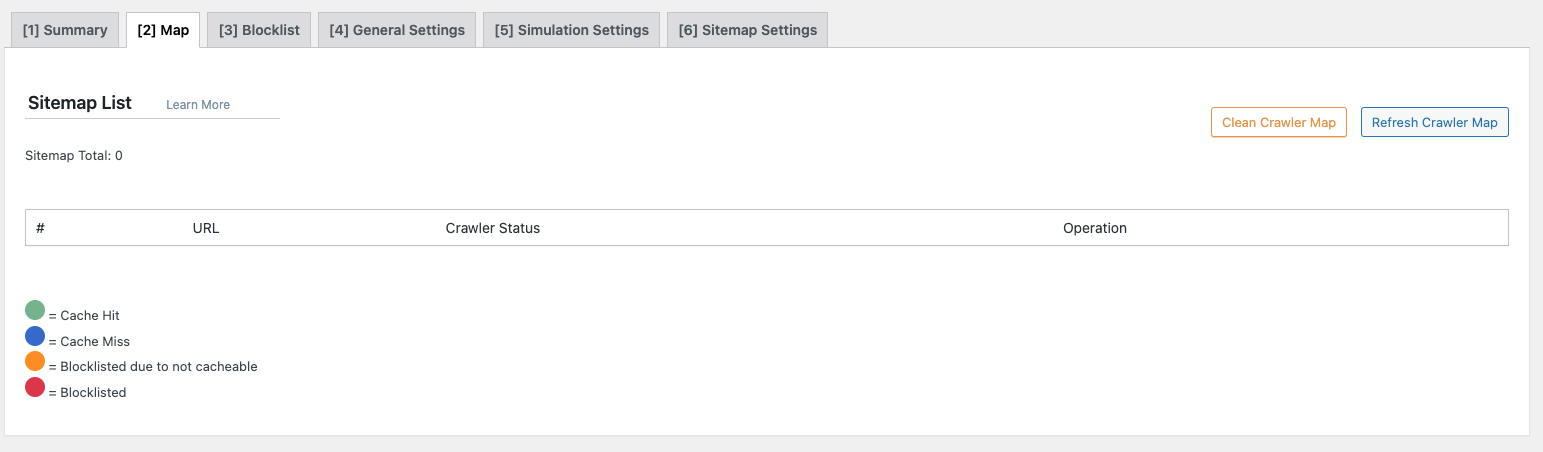
Go to the Map tab. It will likely be blank initially.
-
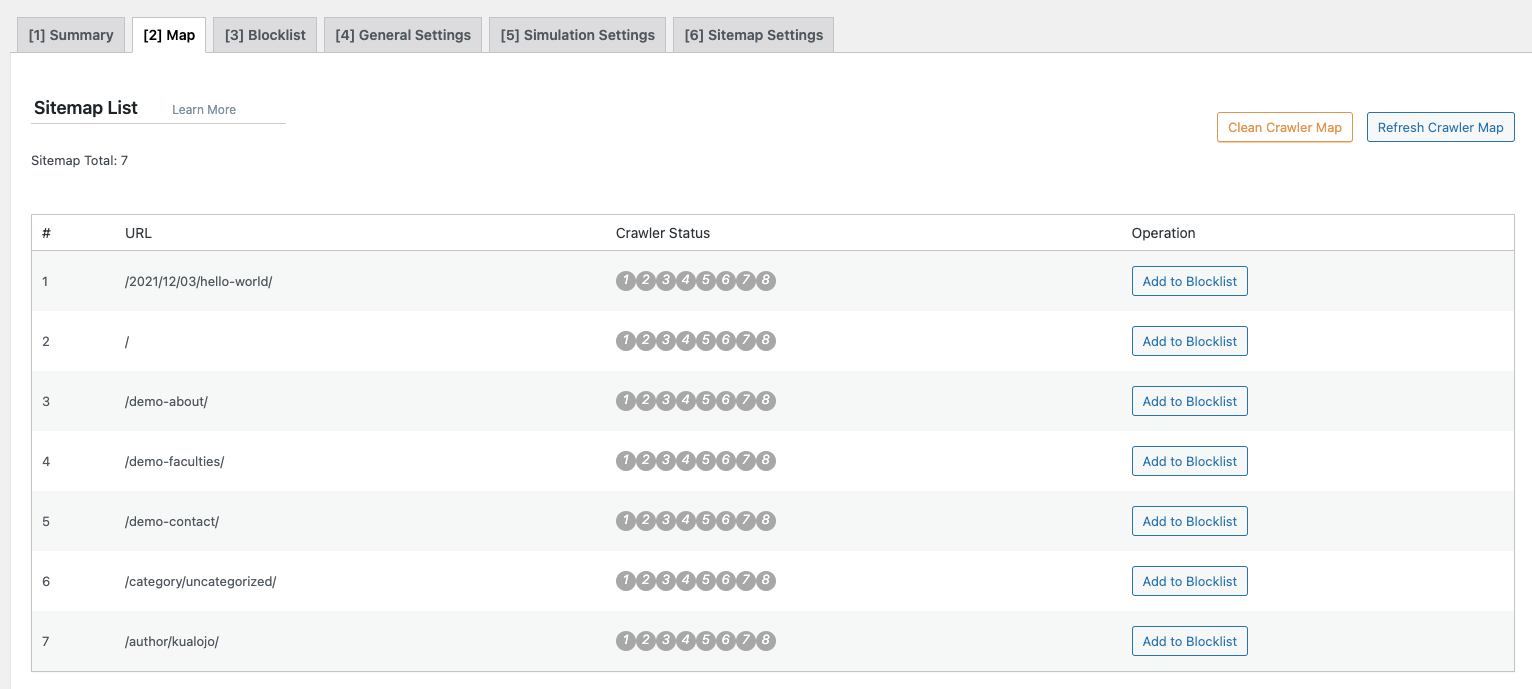
Press Refresh Crawler Map. The page should update with a list of your site's pages.
-
Go to the General Settings tab.
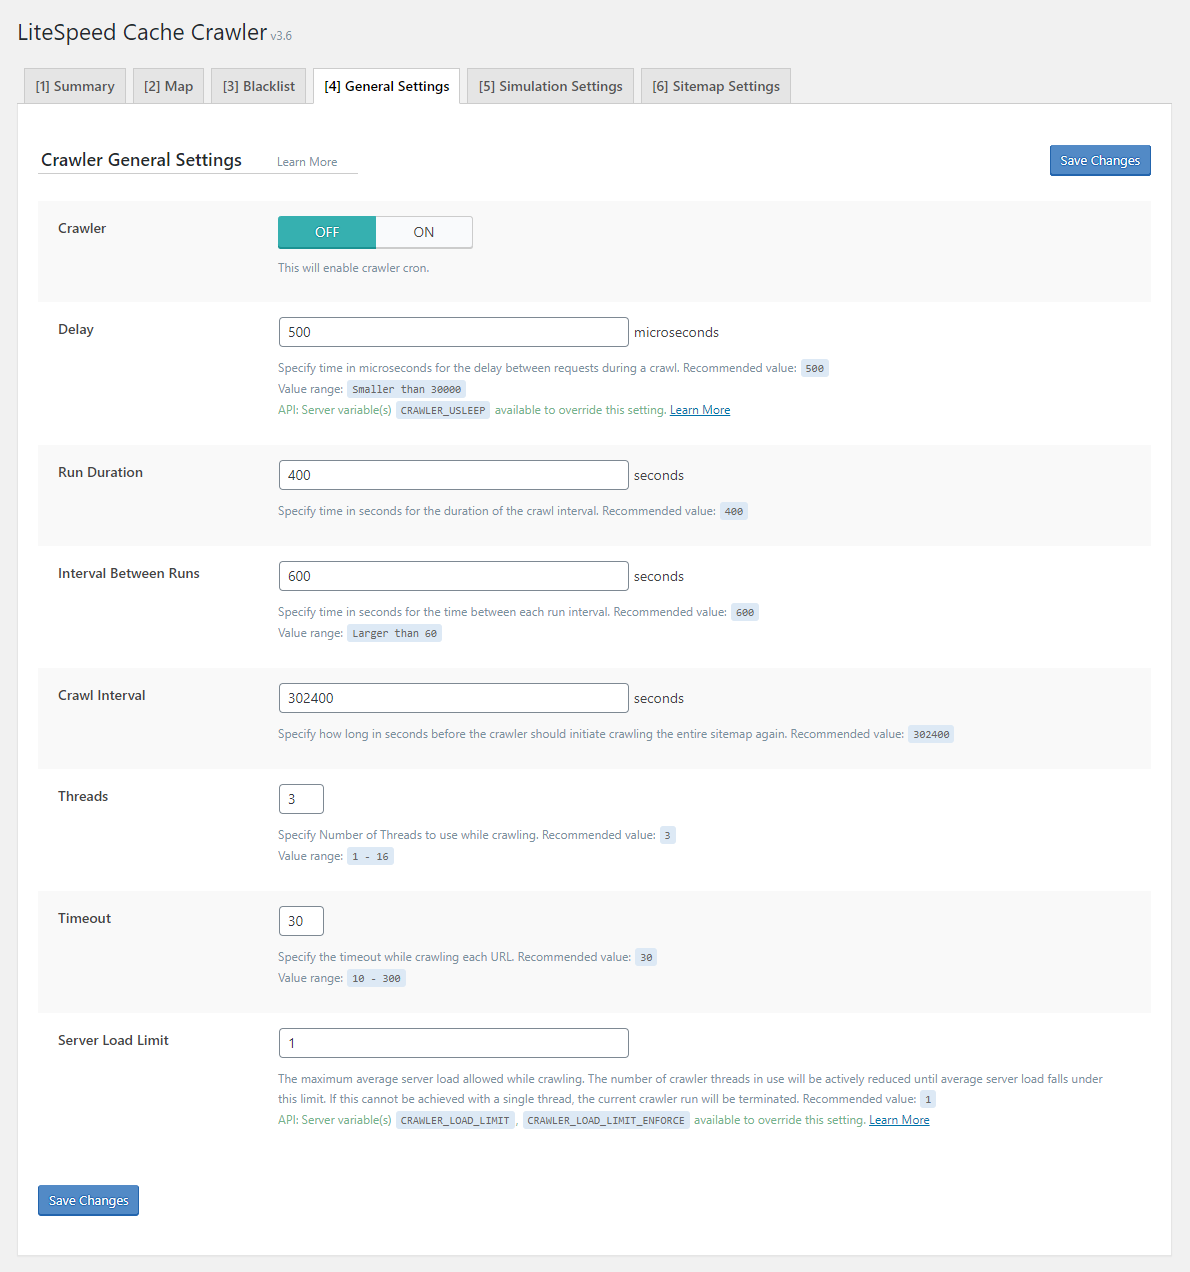
See LiteSpeed's documentation for a full explanation of all options. The key settings are covered below.
-
Ensure Crawler is set to ON.
Delay
Defines how quickly LiteSpeed crawls your site. The default is 500 microseconds. On a Kualo shared hosting plan, the minimum value you can set is 30000. On a VPS or dedicated server, you can set any value, though we recommend keeping the default.
Threads
Defines the number of simultaneous crawl processes. On a Kualo shared hosting plan, set this to 1. On a VPS or dedicated server, the default of 3 is a good starting point, though you can increase it if your server has significant CPU capacity.
Server load limit
This determines whether the crawler will run at all. LiteSpeed's default of 1 is designed for a single-core server and is usually far too low.
To understand this setting: a server with one CPU core is at maximum load when the load reaches 1. A server with 40 cores is at maximum load when the load reaches 40. Setting the limit too low means the crawler may never run even when the server has plenty of spare capacity.
- Kualo shared hosting: Our shared servers may have 40 or more cores. We set a manual override to prevent this limit being set too high. You will see a note such as: NOTE: Server allowed max value: 30. Set the load limit to that value.
- VPS or dedicated server: Set the limit to approximately 75% of your total available cores (rounded to a whole number). For example, on an 8-core VPS, set this to 6.
If in doubt, feel free to ask us.
Other settings
We recommend leaving the defaults for Run Duration and Interval Between Runs. If you start hitting resource limits, reduce Run Duration and increase Interval Between Runs to make crawls less frequent.
For Crawl Interval, the right value depends on how long a full crawl takes. To find out:
- Save your settings and go to the Summary tab.
- Press Manually Run and wait for the crawl to complete (this may take several hours for large sites).
- Note the Run time for Previous Crawler.
- Set Crawl Interval to slightly longer than that run time. For example, if the crawl took 4 hours, set this to 5 hours (18000 seconds).
We do not recommend setting this to less than 1 hour (3600 seconds), even if the crawl completes much faster.
How to check if the crawler is working:
The Summary page shows coloured boxes indicating crawl status:
- Green: Pages visited by the crawler that were already cached. No action needed.
- Blue: Pages successfully crawled that were not previously cached. They are now cached.
- Grey: Pages that could not be crawled for some reason. If you see numbers here after several runs, investigate.
- Red: Pages that were crawled but are manually excluded - this should only appear if you have specifically told LiteSpeed not to crawl certain pages.
Numbers in green or blue are normal. Numbers in grey or red may require attention.
Step 12: Review database optimisation
Your MySQL database can also affect site performance. Over time it may become bloated with data that is no longer needed, which can degrade performance on larger or busier sites. LiteSpeed's database tools let you clean this up. See LiteSpeed's blog post on database optimisation and their detailed documentation for background.
Before doing any database work, take a backup of your account just in case.
If the numbers on this page are in single or double digits, there is not much to worry about. Triple digits or higher may warrant some pruning.
Work through the options one by one, leaving Optimise Tables until last. Before proceeding, consider carefully whether you want to purge post revisions or auto-drafts - once removed, they cannot be recovered. You can configure thresholds:
- Set a maximum number of revisions to keep (for example, setting this to 1 keeps only the most recent revision).
- Set an age threshold to delete old revisions while keeping more recent ones.
For transients, only purge expired ones - there is rarely a need to purge all transients.
Finally, run Optimise Tables to reorganise your tables for efficiency and reclaim disk space. This is always a good idea to do periodically or after removing a large amount of data.
Further down the page you will see a list of database tables using MyISAM, with an option to convert them to InnoDB. Many WordPress installations default to MyISAM for maximum compatibility, but InnoDB is generally more reliable and performs better - it does not lock full tables, so queries run faster. We recommend converting any MyISAM tables to InnoDB.
Database optimisation does not run automatically. How often you should run it depends on the size and activity of your site. We suggest reviewing this page at least once a month, or after making broad changes such as installing or updating plugins.
Step 13: Integrate a CDN
If your website has an international audience, integrating a CDN can further speed up delivery. LiteSpeed can integrate with any CDN service, and also offers quick integration with Cloudflare and their own CDN via QUIC.cloud.
Your options include:
- Cloudflare - available as a basic CDN at no charge.
- QUIC.cloud CDN - has a free tier, after which costs apply. One advantage is that your HTML can be cached at the edge, not just static files, which can dramatically improve speed for international visitors.
- Third-party CDNs such as BunnyCDN - paid services.
If you would like to use QUIC.cloud's CDN, see their documentation for setup instructions.
That is the end of this guide. If you have made it this far, you should have LiteSpeed Cache fully configured for your website. Do not hesitate to get in touch if you have any questions.