On this page
Installing WordPress via WP Toolkit
Install WordPress in minutes using WP Toolkit in cPanel, with full control over settings, updates, and starter Sets.
WP Toolkit in cPanel makes installing WordPress straightforward - answer a few questions, click Install, and your site is live. This guide walks you through every step.
Want a head start? Try installing with a Set - such as the AI Starter Set, which bundles themes and plugins so you can build a polished site with the help of AI.
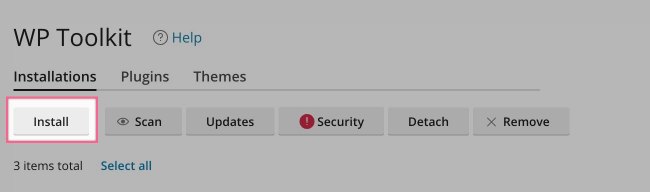
Step 1: Open WordPress management
-
Log in to cPanel.
-
Click WordPress Management from the left-hand menu.

-
Click the Install button at the top of the dashboard.
A configuration panel will open on the left:
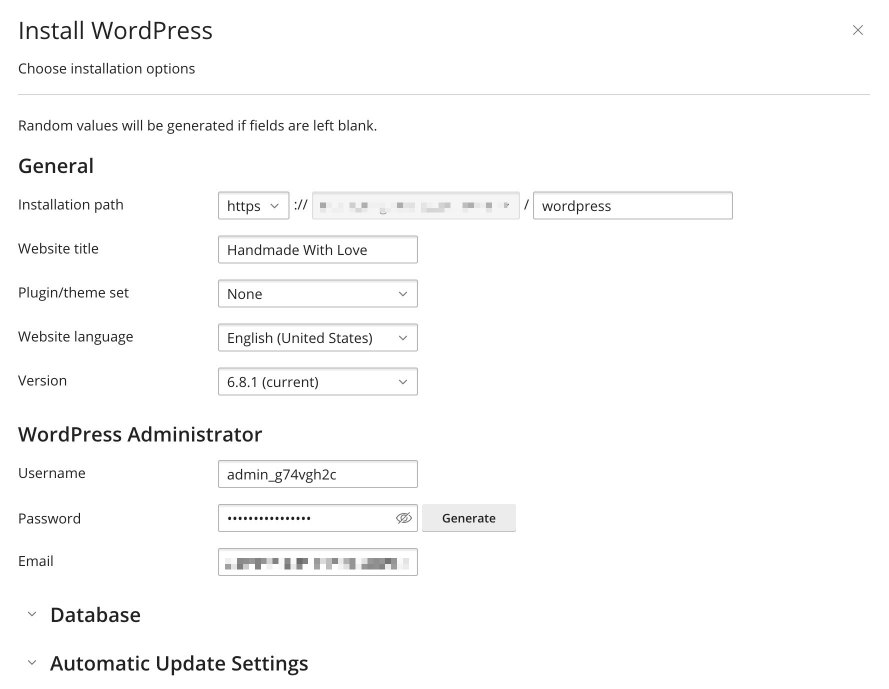
Step 2: Complete the installation form
Installation path
- Protocol: Choose
https://(recommended) orhttp://. If SSL is already set up on your domain,https://will be preselected. - Domain: Select the domain or subdomain you want to use. If your domain is not listed, you will need to add it to cPanel first.
- Directory (optional): Leave this blank to install WordPress at the root of your domain (e.g.
https://example.com). To install in a subdirectory (e.g.https://example.com/blog), enter a folder name such asblog.
Website title
Enter the name of your website. You can change this later from within WordPress.
Plugin/theme Set
Select a predefined Set of plugins and themes, or choose None. See Step 5: Using Sets for more detail.
Website language
Choose the language you want WordPress to use.
Version
The latest version is preselected. Only choose an older version if absolutely required - this is not recommended.
Step 3: WordPress administrator details
- Username: A random username is suggested, but you can enter your own. Avoid generic names like
adminorwpadminfor better security. - Password: Choose a strong password. Use the Generate button to create one automatically.
- Email address: Enter a valid email address. This is used for account recovery and notifications.
Step 4: Advanced settings (optional)
Database
This section is hidden by default. Expand it if you want to customise the database details.
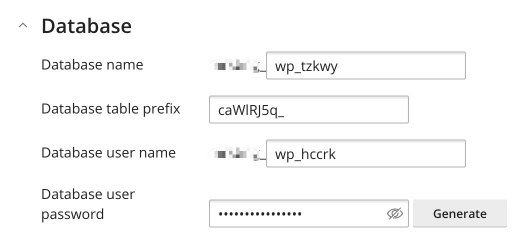
- Database name: If you are running multiple WordPress sites on the same account, give this a recognisable name so you can identify which site it belongs to.
- Table prefix: A unique prefix (such as
wp6x_) helps prevent conflicts and improves security. - Database username and password: Generated automatically unless you change them. Only customise these if you have a specific requirement.
Automatic update settings
Also hidden by default, these settings control how WordPress updates are handled. WP Toolkit can manage updates for WordPress core, plugins, and themes. The defaults suit most users, but you can adjust them to match your workflow.
Update WordPress automatically
Controls how WP Toolkit handles updates to the WordPress core:
| Option | What it does |
|---|---|
| No | No updates are installed automatically. Useful if you prefer full manual control, but not recommended unless you have a staging workflow in place. |
| Yes, but only minor (security) updates | Applies security patches (e.g. 6.8.1) but not major upgrades (e.g. 6.9). A safe choice if you want to avoid potential compatibility issues from major releases. |
| Yes, all (minor and major) updates (default) | Installs all updates automatically, including major releases. Recommended for most users. |
Update plugins automatically
| Option | What it does |
|---|---|
| Defined individually (default) | Each plugin uses its own update setting. You can optionally enable autoupdates by default for any new plugins installed via WP Toolkit. |
| Defined individually, but security updates are autoinstalled | Same as above, but known vulnerable plugins are updated automatically even if their individual setting says otherwise. You can also choose to deactivate vulnerable plugins instead of updating them - useful if you want to avoid breaking changes while still protecting your site. |
| Forced | All plugins are updated automatically, regardless of their individual settings. You can optionally deactivate vulnerable plugins instead of updating them. |
Update themes automatically
| Option | What it does |
|---|---|
| Defined individually (default) | Each theme controls its own update preference. You can optionally enable autoupdates by default for new themes installed via WP Toolkit. |
| Defined individually, but security updates are autoinstalled | Themes follow their own settings, but security patches are applied automatically. |
| Forced | All themes are updated automatically, regardless of their own settings. Best for users who want minimal manual intervention. |
Which settings should you choose?
- For most users: Core - Yes, all updates; Plugins and Themes - Defined individually, but security updates are autoinstalled.
- For advanced users with staging workflows: Core - Yes, but only minor, or No; Plugins and Themes - Defined individually.
- For a set-and-forget approach: Consider Forced updates for plugins and themes. Make sure you back up regularly.
Once your site is installed, you can enable Smart Updates via WP Toolkit. This feature tests updates in a cloned sandbox version of your site before applying them to the live site, so you can stay secure without the risk of breaking something. It cannot be enabled during installation, but you can switch it on afterwards.
Step 5: Using Sets
Sets are pre-packed bundles of themes and plugins - a WordPress starter kit that saves you from the install, activate, configure, repeat routine.
The AI Starter Set
If you want to go from zero to a polished website without getting lost in a plugin rabbit hole, this is the option for you. The AI Starter Set includes:
- Astra theme - lightweight, flexible, and fast
- Spectra page builder - build your site visually without wrestling with blocks
- AI Starter Website Creator plugin - answer a few questions and let AI build your site for you
Learn more about AI Starter Websites
Step 6: Finalise and install
Scroll to the bottom of the form and click Install. WP Toolkit will set everything up and confirm when your site is live.
Step 7: What next?
Your WordPress site is now installed. Here is how to log in and get started.
Log in to your site
You have two ways to access the WordPress dashboard.
Via WP Toolkit: Your new site will appear in the WP Toolkit dashboard. Click the Log in link to access the admin area without entering a password.
Directly via your domain: Once your domain is pointed at the server, you can log in at:
https://yourdomain.com/wp-admin
Domain not pointed yet? You can still preview your site using SkipDNS to create a temporary URL, or by editing your hosts file to access the site locally.
Add more admin users
Once logged in, you can add additional users from the WordPress dashboard under Users - Add New.
If you are working with a developer or content manager, there is no need to give them cPanel or WP Toolkit access. Simply create a WordPress admin account so they can log in directly via /wp-admin.
If you used the AI Starter Set
The setup wizard will launch automatically the first time you log in. Answer a few quick questions and your AI-powered site will be built for you - no design or coding skills required.