On this page
How to integrate LiteMage into Magento
Learn how to install and enable LiteMage Cache for Magento 2 on Kualo hosting using Composer and the Magento CLI.
LiteMage Cache is a full-page cache extension for Magento 2, built on top of LSCache and designed specifically for Magento. It delivers both public and private block caching using ESI hole-punching for fast, complete page caching.
Prerequisites
Before you begin:
- Your store should be running a supported PHP version for your Magento release (all current Magento 2.4 releases require PHP 8.x) with a memory limit of 2G, which Adobe recommends for command-line operations such as compilation.
- Composer requires the PHP ZIP extension.
- You should be comfortable working in a Unix shell over SSH, as Magento 2 uses Composer to manage packages.
- Disable any third-party full-page cache extension before proceeding. Do not disable Magento's built-in Page Cache type - LiteMage requires it to be enabled, and we confirm this in a later step.
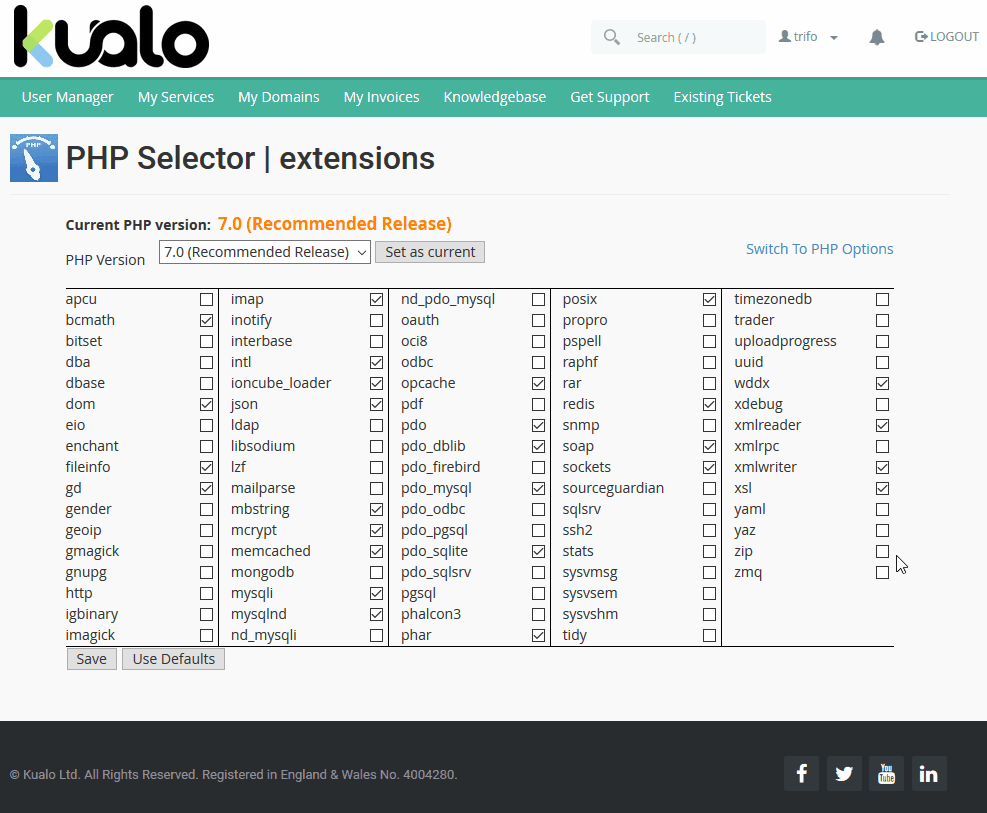
You can adjust your PHP version, extensions, and memory limit using the PHP Selector tool.
Contact our support team if you need help with any of the steps below.
Installing LiteMage 2
Log in to your account via SSH and change to your Magento 2 root directory. On a live store, enable maintenance mode first:
php bin/magento maintenance:enable
Set the deploy mode
Check your current deploy mode:
php bin/magento deploy:mode:show
If it is set to "default" or "developer", you can install LiteMage without changing it. If it is set to "production", switch to developer mode for the installation:
php bin/magento deploy:mode:set developer
Install via Composer
Run the following command to download and install LiteMage 2 from packagist.org into the vendor/litespeed directory:
composer require litespeed/module-litemage
If prompted to authenticate for repo.magento.com, enter your Magento authentication keys: the public key as the username and the private key as the password.
Enable and configure the module
- Enable the LiteMage 2 module in Magento:
php bin/magento module:enable Litespeed_Litemage
- Run the Magento setup upgrade:
php bin/magento setup:upgrade
- If you switched to developer mode earlier, switch back to production. This recompiles code and redeploys static content automatically, so no separate compile step is needed:
php bin/magento deploy:mode:set production
If your store runs in default mode and you did not switch, recompile manually instead:
php bin/magento setup:di:compile
- Disable maintenance mode:
php bin/magento maintenance:disable
Enable LiteMage after installation
- Add the following block to the
.htaccessfile in your Magento root folder:
<IfModule Litespeed>
  LiteMage on
</IfModule>
If your .htaccess file is ever overwritten - for example by a deployment or an extension - this block must be re-added for LiteMage to keep working.
-
Log in to the Magento admin panel and go to Stores > Configuration > Advanced > System.
-
In the "Full Page Cache" section, untick "Use system value" next to Caching Application, select LiteMage Cache Built in to LiteSpeed Server, and click Save Config.
-
Go to System > Cache Management and refresh the Configuration and Page Cache cache types. Confirm that Page Cache shows as enabled - LiteMage cannot work without it.
Testing LiteMage
To confirm LiteMage is working:
- Visit a page that should be cached.
- Right-click the page and select Inspect to open your browser's developer tools.
- Go to the Network tab and refresh the page.
- Select the entry for the current HTML page (usually the first item in the list).
- Under Headers, look for the following response header:
X-LiteSpeed-Cache: hit,litemage
If you see X-LiteSpeed-Cache: miss,litemage, refresh the page and check again - the first request populates the cache.
You can also test from the command line:
curl -sI https://www.yourstore.com/ | grep -i x-litespeed-cache
Run it twice; the first request may show a miss, the second should show a hit.