On this page
How to integrate LiteSpeed Cache into Craft 3
The LiteSpeed Cache plugin for Craft CMS 3 is no longer maintained. The developers recommend using Blitz instead. This article explains the situation and links you to the Blitz plugin.
The LiteSpeed Cache plugin for Craft CMS 3 is no longer maintained. The plugin developers recommend using Blitz as a replacement. We recommend migrating to Blitz rather than continuing to use this plugin.
This guide originally walked you through installing and configuring the LiteSpeed Cache plugin for Craft CMS 3 on your Kualo hosting account. Because the plugin is no longer maintained, the steps below are preserved for reference only. For new installations, please use Blitz instead.
Before you begin, make sure you have enabled LiteSpeed Cache in cPanel. See How to enable LiteSpeed Cache in cPanel if you have not done this yet.
Installing LiteSpeed Cache through the dashboard
-
Log into your Craft CMS admin panel.
-
Click the Plugin Store menu.

-
Search for LiteSpeed Cache in the store.

-
Click the LiteSpeed Cache plugin result, then click Install.
Installing LiteSpeed Cache via the command line
SSH access must be enabled on your account before you can use the commands below. Open a ticket with our HelpDesk if you need SSH access enabled.
- Navigate to your Craft project folder.
- Run the following Composer command:
composer require thoughtfulweb/lite-speed-cache
Setting up the LiteSpeed Cache plugin
Once the plugin is installed, complete the following steps to finish the configuration.
-
Log into the Craft CMS dashboard.
-
Go to Settings > Plugins.
-
Click the gear icon next to LiteSpeed Cache and choose Install.
-
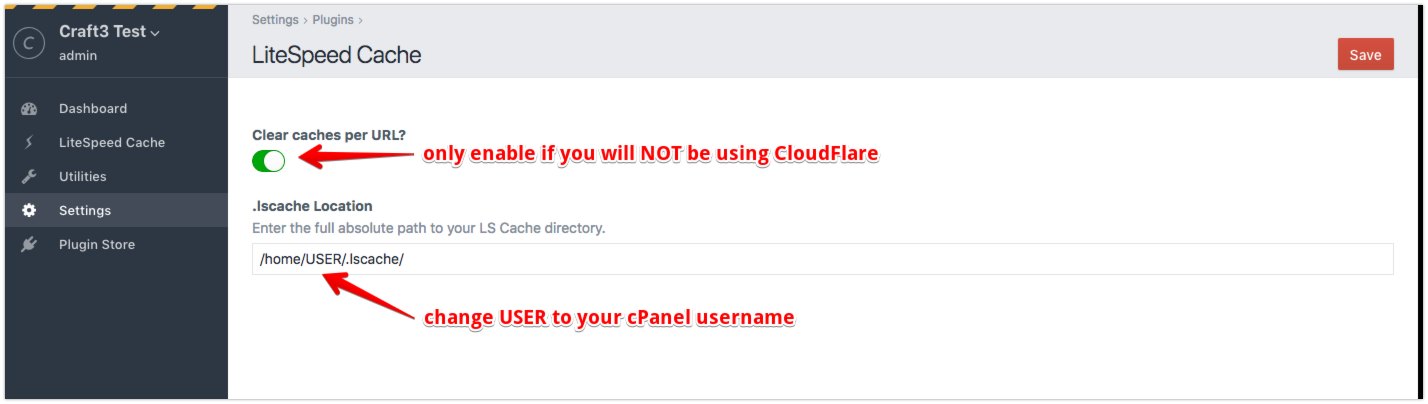
Once installed, click the Settings link.
-
Enable Clear caches per URL - unless you are using Cloudflare. Because Cloudflare acts as a reverse proxy, per-URL purging is not compatible with it.
-
In the .lscache Location box, enter the path below, replacing
USERwith your cPanel username:/home/USER/.lscache/ -
Click Save in the upper right of the page.
-
Add the following lines to the top of your
.htaccessfile:
########## Begin - LiteSpeed Cache
<IfModule LiteSpeed>
    RewriteEngine On
    RewriteCond %{REQUEST_METHOD} ^HEAD|GET$
    RewriteCond %{ORG_REQ_URI} !/admin
    RewriteCond %{ORG_REQ_URI} !/index.php/admin
    RewriteRule .* - [E=Cache-Control:max-age=86400]
</IfModule>
########## End - LiteSpeed Cache
LiteSpeed Cache should now be active. You can confirm it is working by following the steps in the Verify if LiteSpeed Cache is working article.
If you need help with any of the above, please contact our support team via the HelpDesk.
Purging LiteSpeed Cache from the dashboard
You can manually clear the LiteSpeed Cache at any time from the dashboard.
-
Click the LiteSpeed Cache menu in the dashboard.
-
Click the Clear LiteSpeed Cache button.