On this page
Pointing your domain to Kualo without changing nameservers
If your domain's DNS is managed at Cloudflare, your registrar, or another provider, you do not have to move it to our nameservers to use Kualo hosting. This guide explains how to point specific DNS records at us while leaving everything else where it is.
If your domain's DNS is managed at Cloudflare, your registrar, or another provider, you do not have to move it to our nameservers to use Kualo hosting. You can instead point specific DNS records at us while leaving everything else where it is. This approach works, but it comes with real trade-offs that are worth understanding before you commit.
Before you start: understand the trade-offs
Using a third-party DNS provider instead of our nameservers means you take on more ongoing responsibility for keeping your DNS records correct. Here are the main things to consider.
IP address changes require your action. If we ever need to move your site to a different server - for maintenance, an upgrade, or a hardware issue - your A record will point to the wrong IP until you update it yourself. We will let you know, but the change is yours to make. If your DNS were with us, we would handle it automatically.
cPanel features create extra work. When you create a subdomain, addon domain, or email account in cPanel, we add the necessary DNS records to your zone automatically. If your DNS is hosted elsewhere, those records will not appear there. You will need to add them manually every time.
AutoSSL can become unreliable. AutoSSL - the tool that issues and renews your free SSL certificate - works by either placing a validation file on your site or adding a DNS record to your zone. If your DNS is with a third party, the DNS method is unavailable to us. That means AutoSSL falls back entirely to file-based validation. If anything blocks that - a security plugin, a firewall rule, or a .htaccess directive that blocks the AutoSSL user agent - the certificate may fail to renew with no fallback available. You can read more about this in our article on using AutoSSL with Cloudflare.
Domain transfers can break your DNS. If your domain is currently registered with a provider that also hosts your DNS, and you later transfer the domain away, your DNS zone may be deleted as part of that process. Your site and email could go offline until you rebuild the zone elsewhere.
None of these issues are insurmountable, but they are worth weighing up. If you would prefer a simpler setup, pointing your nameservers to us means we manage all of this for you.
What you will need
Before making any changes, gather the following:
- Access to your DNS provider's control panel (Cloudflare, your registrar, or wherever your DNS is hosted)
- Your Kualo hosting account's IP address (see below for how to find it)
- The hostname of our mail server for your account (see below)
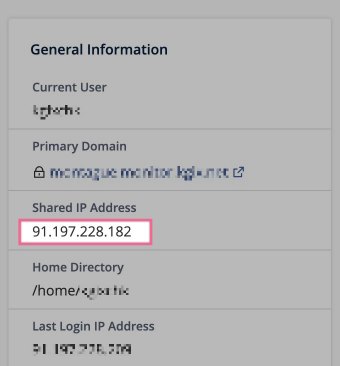
Step 1: Find your hosting IP address
- Log in to cPanel.
- Look at the General Information panel on the right-hand side of the home screen.
- You will see either Shared IP Address or Dedicated IP Address listed there.
- Make a note of that IP address - you will need it in the next step.
Step 2: Find your mail server hostname
- In cPanel, go to Email Accounts.
- Click Connect Devices next to any email address on your domain.
- Note the incoming mail server hostname - it will be in the format
mail.yourdomain.comor a server hostname such asserver123.kualo.com.
Alternatively, you can check the email client configuration details in cPanel for the correct server names.
Step 3: Update your A record
Log in to your DNS provider and find the DNS management area for your domain. Locate the existing A record for the root domain (often shown as @ or your bare domain name) and update it to point to your Kualo hosting IP address.
| Record type | Name | Value | TTL |
|---|---|---|---|
| A | @ (or your domain) | Your Kualo IP address | 3600 |
If you also want www.yourdomain.com to resolve, add or update a second A record:
| Record type | Name | Value | TTL |
|---|---|---|---|
| A | www | Your Kualo IP address | 3600 |
Alternatively, you can add a CNAME record pointing www to your root domain, if your DNS provider supports it and you do not already have conflicting records.
If you are using Cloudflare and have the orange cloud (proxy) enabled on your A record, traffic passes through Cloudflare's network before reaching us. This affects how AutoSSL works - see using AutoSSL with Cloudflare for the specific settings you need.
Step 4: Update your MX records
If you want email for your domain to be handled by Kualo, you need to update your MX records too. Remove any existing MX records and replace them with ours.
The correct MX records depend on your hosting type.
Shared hosting (most customers)
Shared hosting accounts route inbound mail through our SpamExperts filtering service. Use these MX records:
| Record type | Name | Value | Priority | TTL |
|---|---|---|---|---|
| MX | @ (or your domain) | mail1.filteredmx.net |
10 | 3600 |
| MX | @ (or your domain) | mail2.filteredmx.net |
20 | 3600 |
| MX | @ (or your domain) | mail3.filteredmx.net |
30 | 3600 |
Using these hostnames ensures your inbound mail passes through SpamExperts before being delivered to your mailbox. If you point MX records directly at your mail server hostname instead, you will bypass spam filtering entirely.
Reseller hosting, VPS, or dedicated server (without SpamExperts)
If you are on a reseller, VPS, or dedicated server plan and SpamExperts is not enabled on your account, point your MX record directly at your mail server hostname instead:
| Record type | Name | Value | Priority | TTL |
|---|---|---|---|---|
| MX | @ (or your domain) | mail.yourdomain.com |
0 | 3600 |
Replace mail.yourdomain.com with the mail server hostname you found in Step 2. If you are unsure which setup applies to you, contact our support team and we can confirm the correct records for your account.
If your email is handled by a third-party provider such as Google Workspace or Microsoft 365, do not change your MX records. Leave them pointing at that provider and skip this step entirely.
You may also want to add or update your SPF record to include our mail servers. If you are unsure how SPF works, our article on DNS record types covers the basics.
Step 5: Configure email routing in cPanel
Once your MX records are updated, make sure cPanel knows where to deliver incoming mail.
- In cPanel, go to Email Routing (sometimes listed under the Mail section).
- Select your domain and choose Local Mail Exchanger (if we are hosting your email) or Remote Mail Exchanger if your email is being handled by a 3rd party.
- Click Change.
If this is set incorrectly, email may loop or be rejected. Our article on configuring email routing in cPanel explains the options in detail.
Step 6: Wait for DNS propagation
DNS changes do not take effect instantly. Depending on the TTL set on your existing records, propagation can take anywhere from a few minutes to 48 hours. Our article on DNS propagation explains what to expect and how to check progress.
If you want to test your site on Kualo before your DNS change has propagated, you can use SkipDNS to preview it without affecting live visitors.
Keeping your DNS up to date going forward
Once your records are live, remember that any new subdomains or other features you set up in cPanel may need corresponding DNS records added manually at your DNS provider. cPanel will create the records in your local zone, but those records will not be visible to the internet unless you replicate them at your external provider.
If you find this becomes burdensome, you can always switch to using our nameservers at any point. See which nameservers should I use and updating nameservers at Kualo for guidance.