On this page
How to deploy a Ruby on Rails application
Deploy a Ruby on Rails application on Kualo hosting using cPanel's Ruby Selector and Phusion Passenger.
This guide walks you through deploying a Ruby on Rails application on Kualo hosting, using Redmine as a worked example. If you have not yet enabled Ruby in cPanel, start with Enabling Ruby in cPanel before continuing.
Kualo hosting uses Phusion Passenger as the web server for Ruby applications. The Ruby Selector handles the setup for you: it adds the required Passenger directives to your .htaccess file and installs Ruby inside an isolated virtual environment.
What is Redmine?
Redmine is a flexible, open-source project management web application built with Ruby on Rails. It is cross-platform and supports multiple databases.
Setting up the application in Ruby Selector
- Open Ruby Selector in cPanel and add your application base folder.
- Choose your Ruby version and set the application root path - for example,
/home/rubytest/myapps/redmine. - Click Setup.
The selector creates three folders inside your application root by default: tmp, public, and logs. Any files that need to be publicly accessible must go inside the public folder.
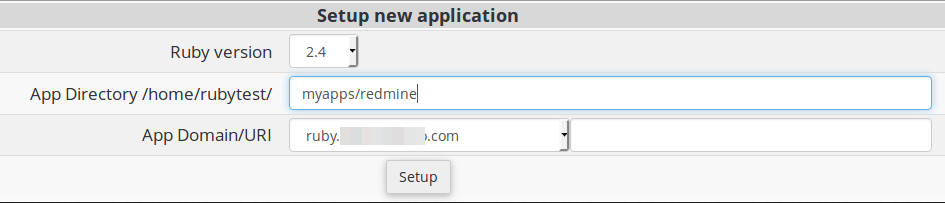
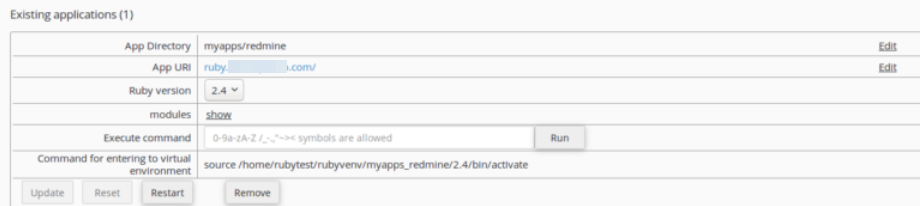
After setup, the selector displays the command you need to activate the Ruby virtual environment via SSH.
Downloading Redmine
Connect to your account via SSH, then run the following commands to download and unpack Redmine into your application root:
cd myapps
wget https://www.redmine.org/releases/redmine-3.4.5.tar.gz
tar xvfz redmine-3.4.5.tar.gz
mv redmine-3.4.5/* redmine
rm -f redmine-3.4.5.tar.gz
Redmine already includes a public folder, so moving its contents directly into your application root is correct.
Installing Redmine
Step 1 - Create a database
Create a MySQL database and assign a user to it inside cPanel. Make a note of the database name, username, and password.
Step 2 - Configure the database connection
- Navigate to
myapps/redmine/config/. - Copy
database.yml.exampletodatabase.yml. - Edit
database.yml, keeping only theproductionblock and updating it with your database details:
production:
  adapter: mysql2
  database: user_redmine
  host: localhost
  username: user_redmine
  password: my_password
Step 3 - Activate Ruby and install Bundler
Bundler reads the Gemfile in your application root and installs all required gems. First, activate the Ruby virtual environment using the command shown by the Ruby Selector, then install Bundler:
source /home/rubytest/rubyvenv/myapps_redmine/2.4/bin/activate
gem install bundler
Step 4 - Install dependencies
From the application root directory (where Gemfile is located), run:
bundle install --without development test
The --without development test flag tells Bundler to skip gems that are only needed for development and testing environments.
If Bundler cannot find the Gemfile, check that you are running the command from the correct directory.
Step 5 - Resolve missing gem errors
If you see an error such as LoadError: cannot load such file -- bigdecimal, a required gem is missing from the Gemfile. The most reliable fix is to add it explicitly rather than installing it outside Bundler.
- Open
Gemfilein your application root. - Add the missing gem, for example:
gem "bigdecimal"
- Run
bundle installagain to install the new dependency.
Step 6 - Generate a secret token
This command generates a random key that Rails uses to sign and encrypt session cookies. Run it from the application root:
bundle exec rake generate_secret_token
Generating a new token will invalidate any existing sessions after the next restart.
Step 7 - Set up the database schema
Create the database tables by running:
RAILS_ENV=production bundle exec rake db:migrate
Step 8 - Load default data
Populate the database with Redmine's default configuration data:
RAILS_ENV=production bundle exec rake redmine:load_default_data
Viewing your application
Once all steps are complete, visit your domain name in a browser. You should see your Ruby on Rails application running.