On this page
How to deploy a Python application
Deploy a Python application on Kualo hosting using cPanel's Python Selector and Phusion Passenger, with a full Wagtail CMS example.
This guide walks you through deploying a Python application on Kualo hosting using cPanel's Python Selector. We use Wagtail CMS as a practical example, but the same approach applies to any Python web application.
Before you begin, make sure you have enabled Python in cPanel. See the separate article "Enabling Python in cPanel" for instructions.
How the Python Selector works
The Python Selector configures everything you need to run a Python application under Phusion Passenger. Specifically, it:
- Adds the required Passenger directives to your
.htaccessfile - Installs and configures Python inside a virtual environment
When you create an application, the Selector generates three default directories inside your chosen application root: tmp, public, and logs. Files that need to be publicly accessible must go inside the public folder.
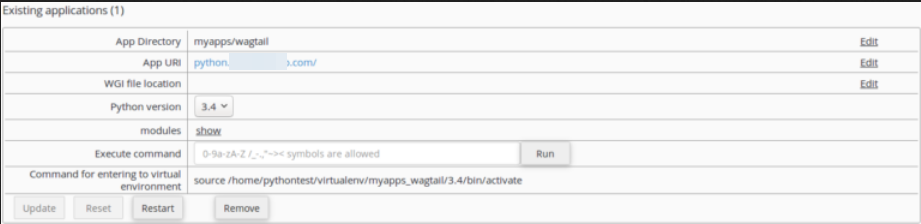
Setting up the application in Python Selector
- Log in to cPanel and open the Python Selector.
- Add your application, setting the application root to the path you want - for example,
/home/pythontest/myapps/wagtail. - Choose your Python version.
- Click Setup.
The Selector creates the directory structure and displays the command you need to activate the virtual environment over SSH.

Installing and configuring Wagtail
The rest of the setup happens over SSH. You will:
- Activate the virtual environment
- Install the Wagtail module via pip
- Create a new Wagtail project
- Run database migrations
- Create a superuser
- Configure
passenger_wsgi.py
Step 1 - activate the virtual environment
SSH into your account and run the activation command shown by the Python Selector. It will look similar to this:
source /home/pythontest/virtualenv/myapps_wagtail/3.6/bin/activate
Your prompt will change to show the active environment:
(myapps/wagtail:3.6)pythontest@ ~ $
Step 2 - install Wagtail using pip
pip is the standard Python package manager and the recommended way to install modules:
pip install wagtail
Step 3 - create a new Wagtail project
Wagtail provides a wagtail start command (similar to Django's django-admin startproject) that scaffolds a new project. Navigate to your public folder and run it:
cd ~/myapps/wagtail/public
wagtail start mywag
You can replace mywag with any project name you like.
Once created, change into the project directory:
cd mywag
You will see several items worth noting:
manage.py- a command-line tool for running administrative tasks, commonly provided by Django-based applications.requirements.txt- lists all Python modules the application depends on. You can install them all at once withpip install -r requirements.txt.mywag/- the application package folder. This is the directory you will need to reference inpassenger_wsgi.py.
Step 4 - configure the database
Wagtail uses SQLite3 by default, but also supports MySQL and PostgreSQL. To change the database backend, edit mywag/settings/base.py. The relevant section looks like this:
DATABASES = {
    'default': {
        'ENGINE': 'django.db.backends.sqlite3',
        'NAME': os.path.join(BASE_DIR, 'db.sqlite3'),
    }
}
For this example we will keep SQLite3. Run the migrations to set up the database:
python manage.py migrate
If you want to use MySQL or PostgreSQL instead, refer to the Django database settings documentation at https://docs.djangoproject.com/en/stable/ref/settings/#databases
Step 5 - create a superuser
python manage.py createsuperuser
Follow the prompts to set a username, email address, and password:
Username (leave blank to use 'pythontest'): kualo
Email address: [email protected]
Password:
Password (again):
Superuser created successfully.
Configuring passenger_wsgi.py
Phusion Passenger uses passenger_wsgi.py as the entry point for your application - the equivalent of index.php for PHP sites. The Python Selector creates this file automatically in your application root.
Wagtail includes its own wsgi.py file, which you can use as the basis for passenger_wsgi.py. You need to make two small changes so Passenger can find your project:
- Add
systo the import line at the top of the file:
import os, sys
- Immediately below the imports, add your project directory to the Python path:
sys.path.append("/home/pythontest/myapps/wagtail/public/mywag")
Replace that path with the actual path to your own project folder.
Once saved, visit your domain with /admin appended to the URL and log in with the superuser credentials you created earlier.